Deploying Tangerine for Offline (or Online) Data Collection
Reffer to Update the App to see how to update an app that is already installed
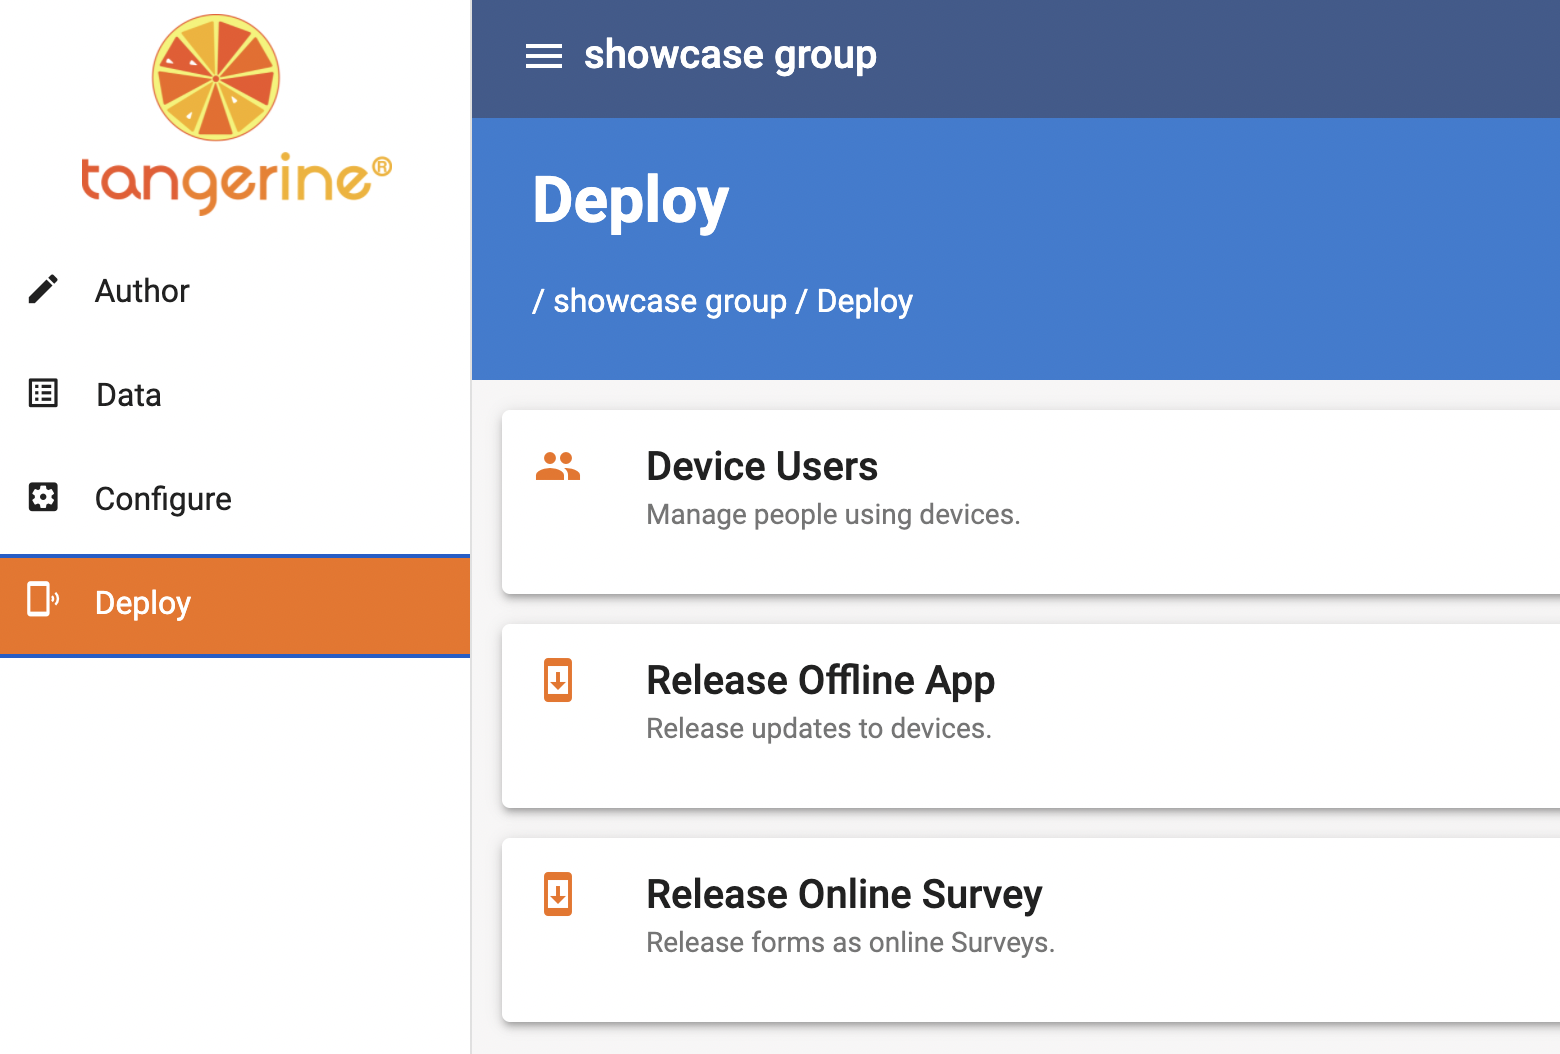
After you have rendered your forms it is time to deploy them. A deployment means that you will create a version of the forms to be installed(or updated) on a tablet. Tangerine offers different type of deployment releases available under your group's Deploy tab.
Note that we use a release for both to create a new installation but also to create an update for tablets that have the app installed already.
Release Offline (require installation) APK (Android package file) creates a link with an APK file that can be downloaded and installed on an Android device in offline mode. Browser (PWA) creates a link to the app to be installed inside the Chrome browser on Window, Linux, or Mac but also on Android Chrome mobile app. The installation requires internet connection but the application can be used offline once installed Release Online Survey - deploys a single form to be used by a user in a browser without installation but requires internet connection
Upon selecting "Release Offline App", you will see the screen below.
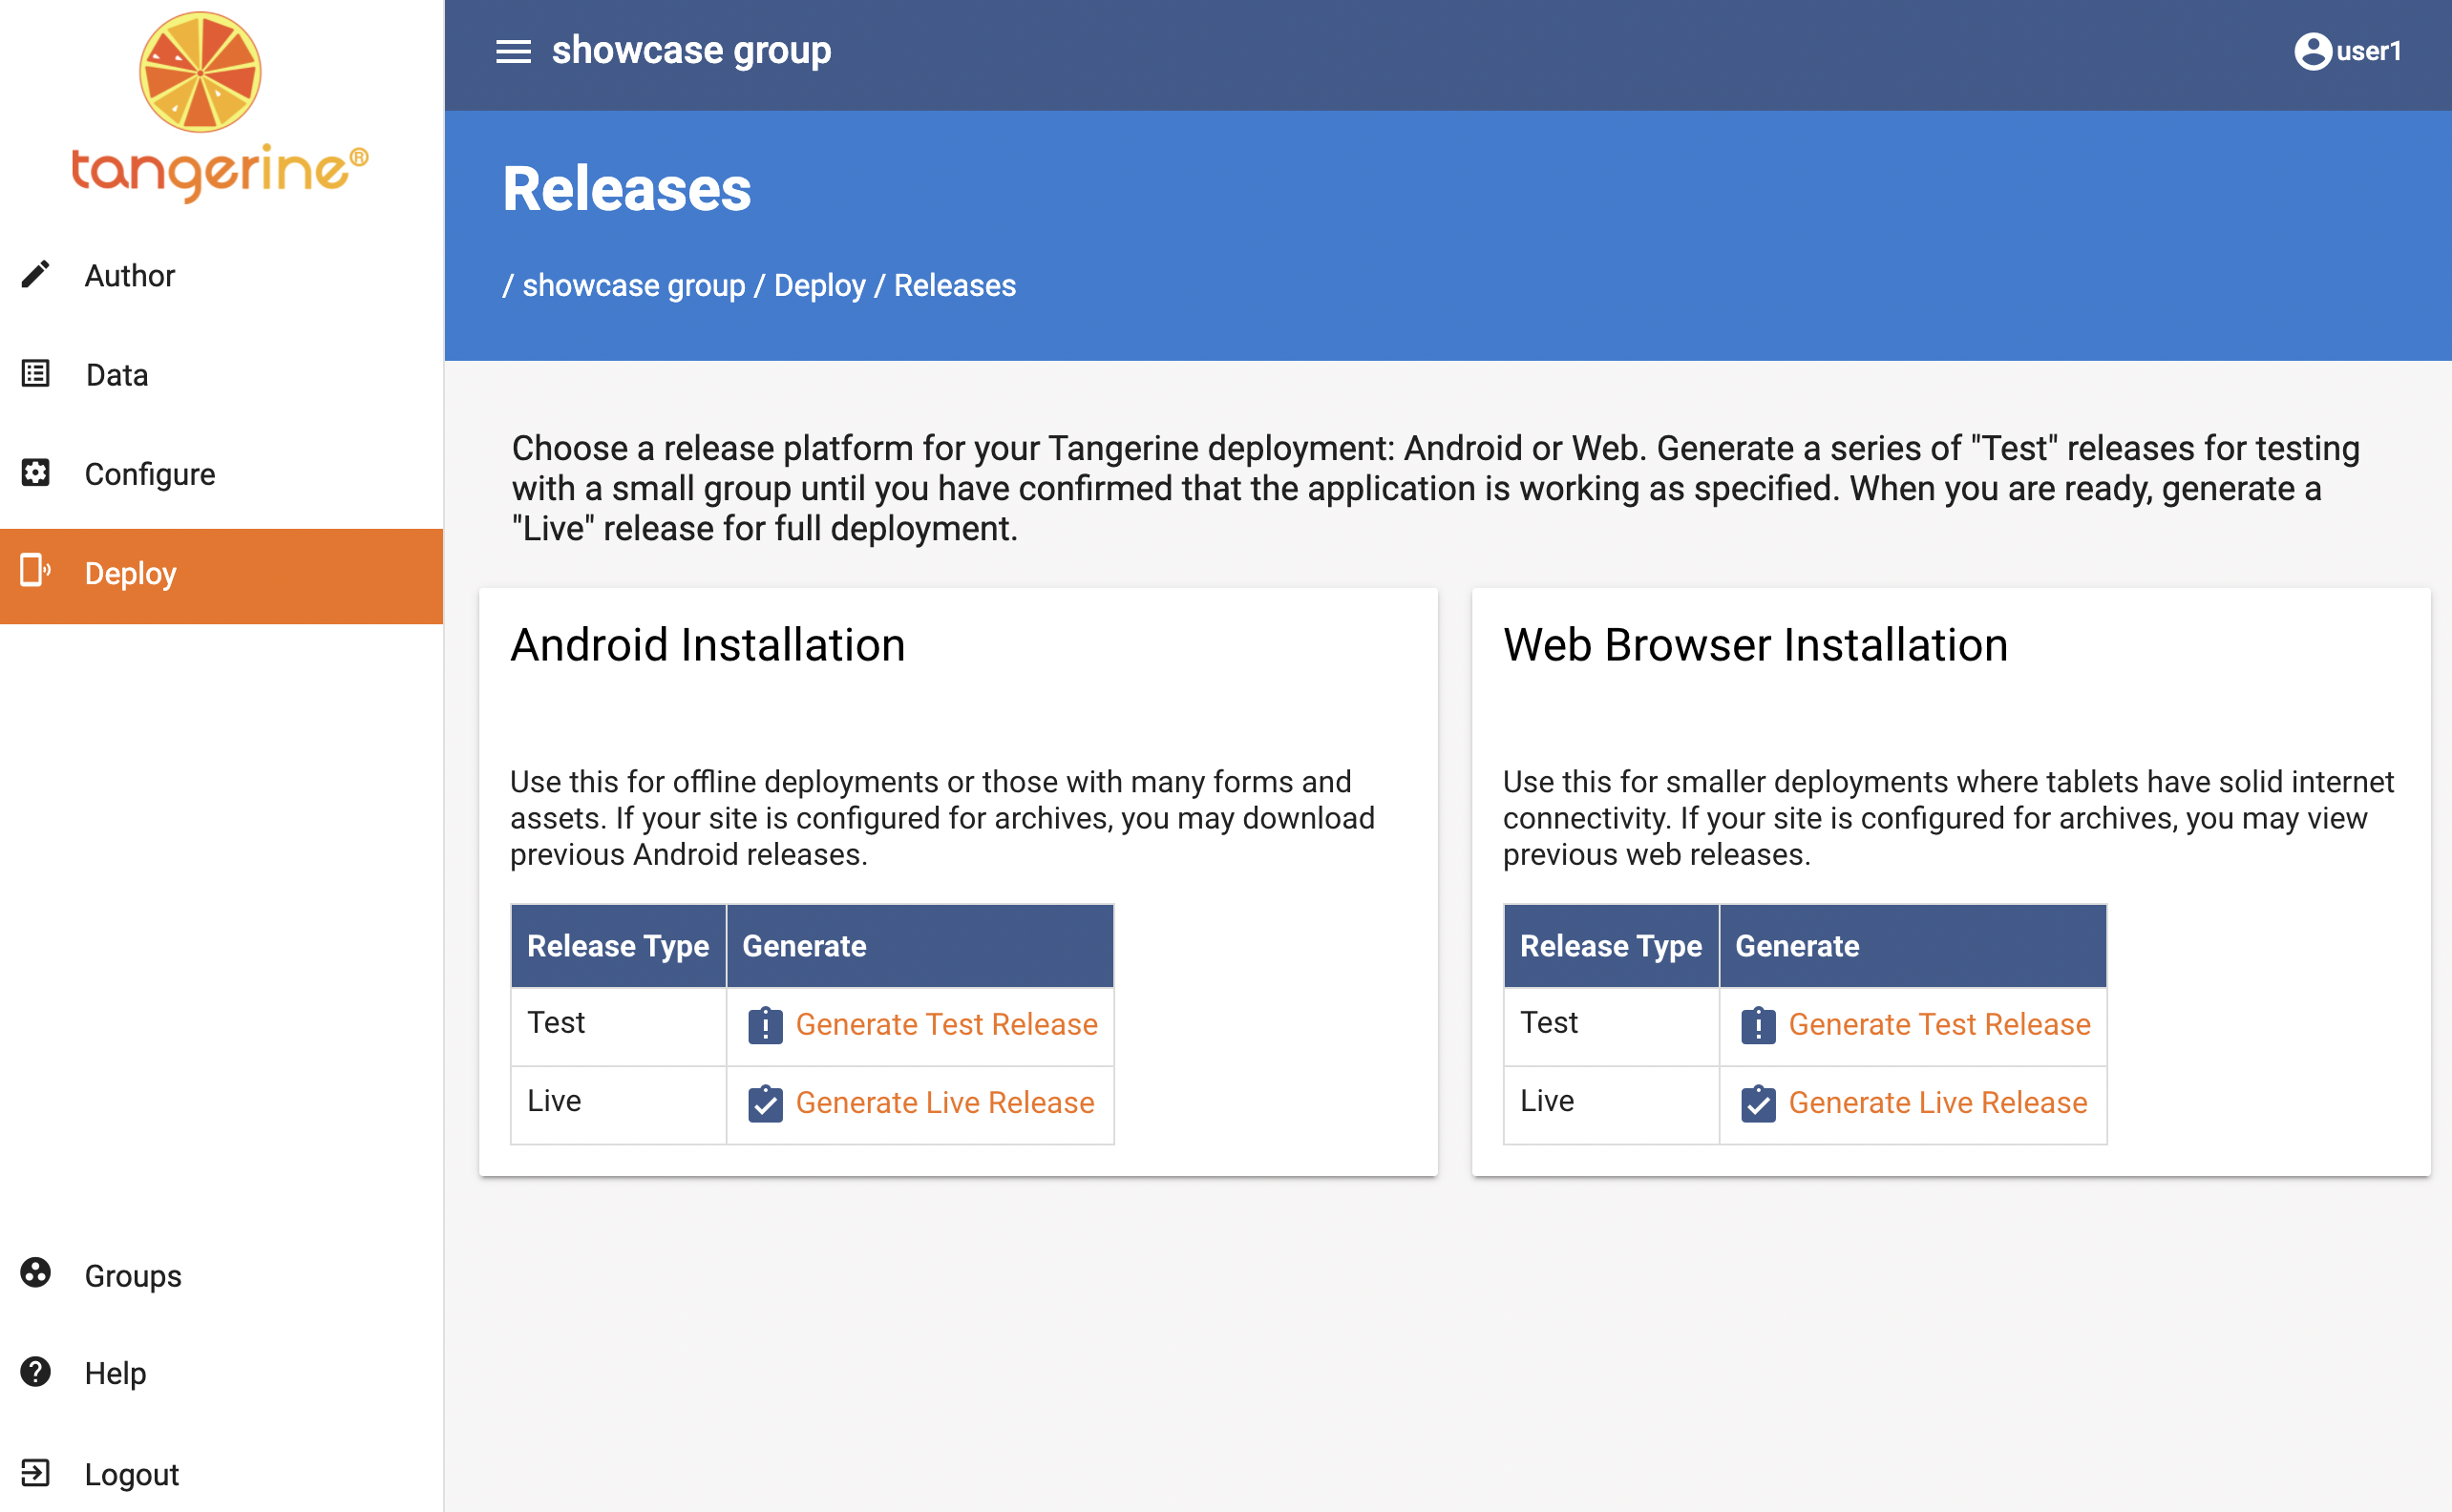
Tangerine offers two deployment types, test release and live release:
-
Test Release -- This release option ("release to QA") is recommended for testing the instruments. When you make changes and updates to the instruments and release your changes as "Test Release", tablets that have the "live" version of Tangerine installed will NOT receive this update. HOWEVER, any data synced from the tablet devices even in a "Test Release" deployment goes into the main database (thus mark your tests clearly as "TESTS" to facilitate data cleaning.
-
Live Release -- When instruments/forms are final, or instrument edits have been tested, use this release option ("release to production"). In this case, tablets that are already collecting data, or have the group's apk installed, will received an update request when connecting to the Internet the next time. All data collected from this release will also be added to the main database.
Tangerine also offers two deployment /installation strategies, Android installation or web browser installation:
-
Android Installation. This is the standard deployment package where an actual apk file can be generated on the computer, downloaded, and then copied over to a mobile device via a USB cable and installed. This method of deployment is suitable in slow network environment or when the apk is large.
-
Web Browser Installation. This deployment strategy requires an Internet connection on the tablet for the Tangerine to be installed. Once installed, the app can work again offline. This method is suitable in places of good connectivity.
NOTE: We recommend thoroughly testing your instruments and its data output before releasing them! To test your instrument use the Test Release mode.
Using standard installation
Android Installation
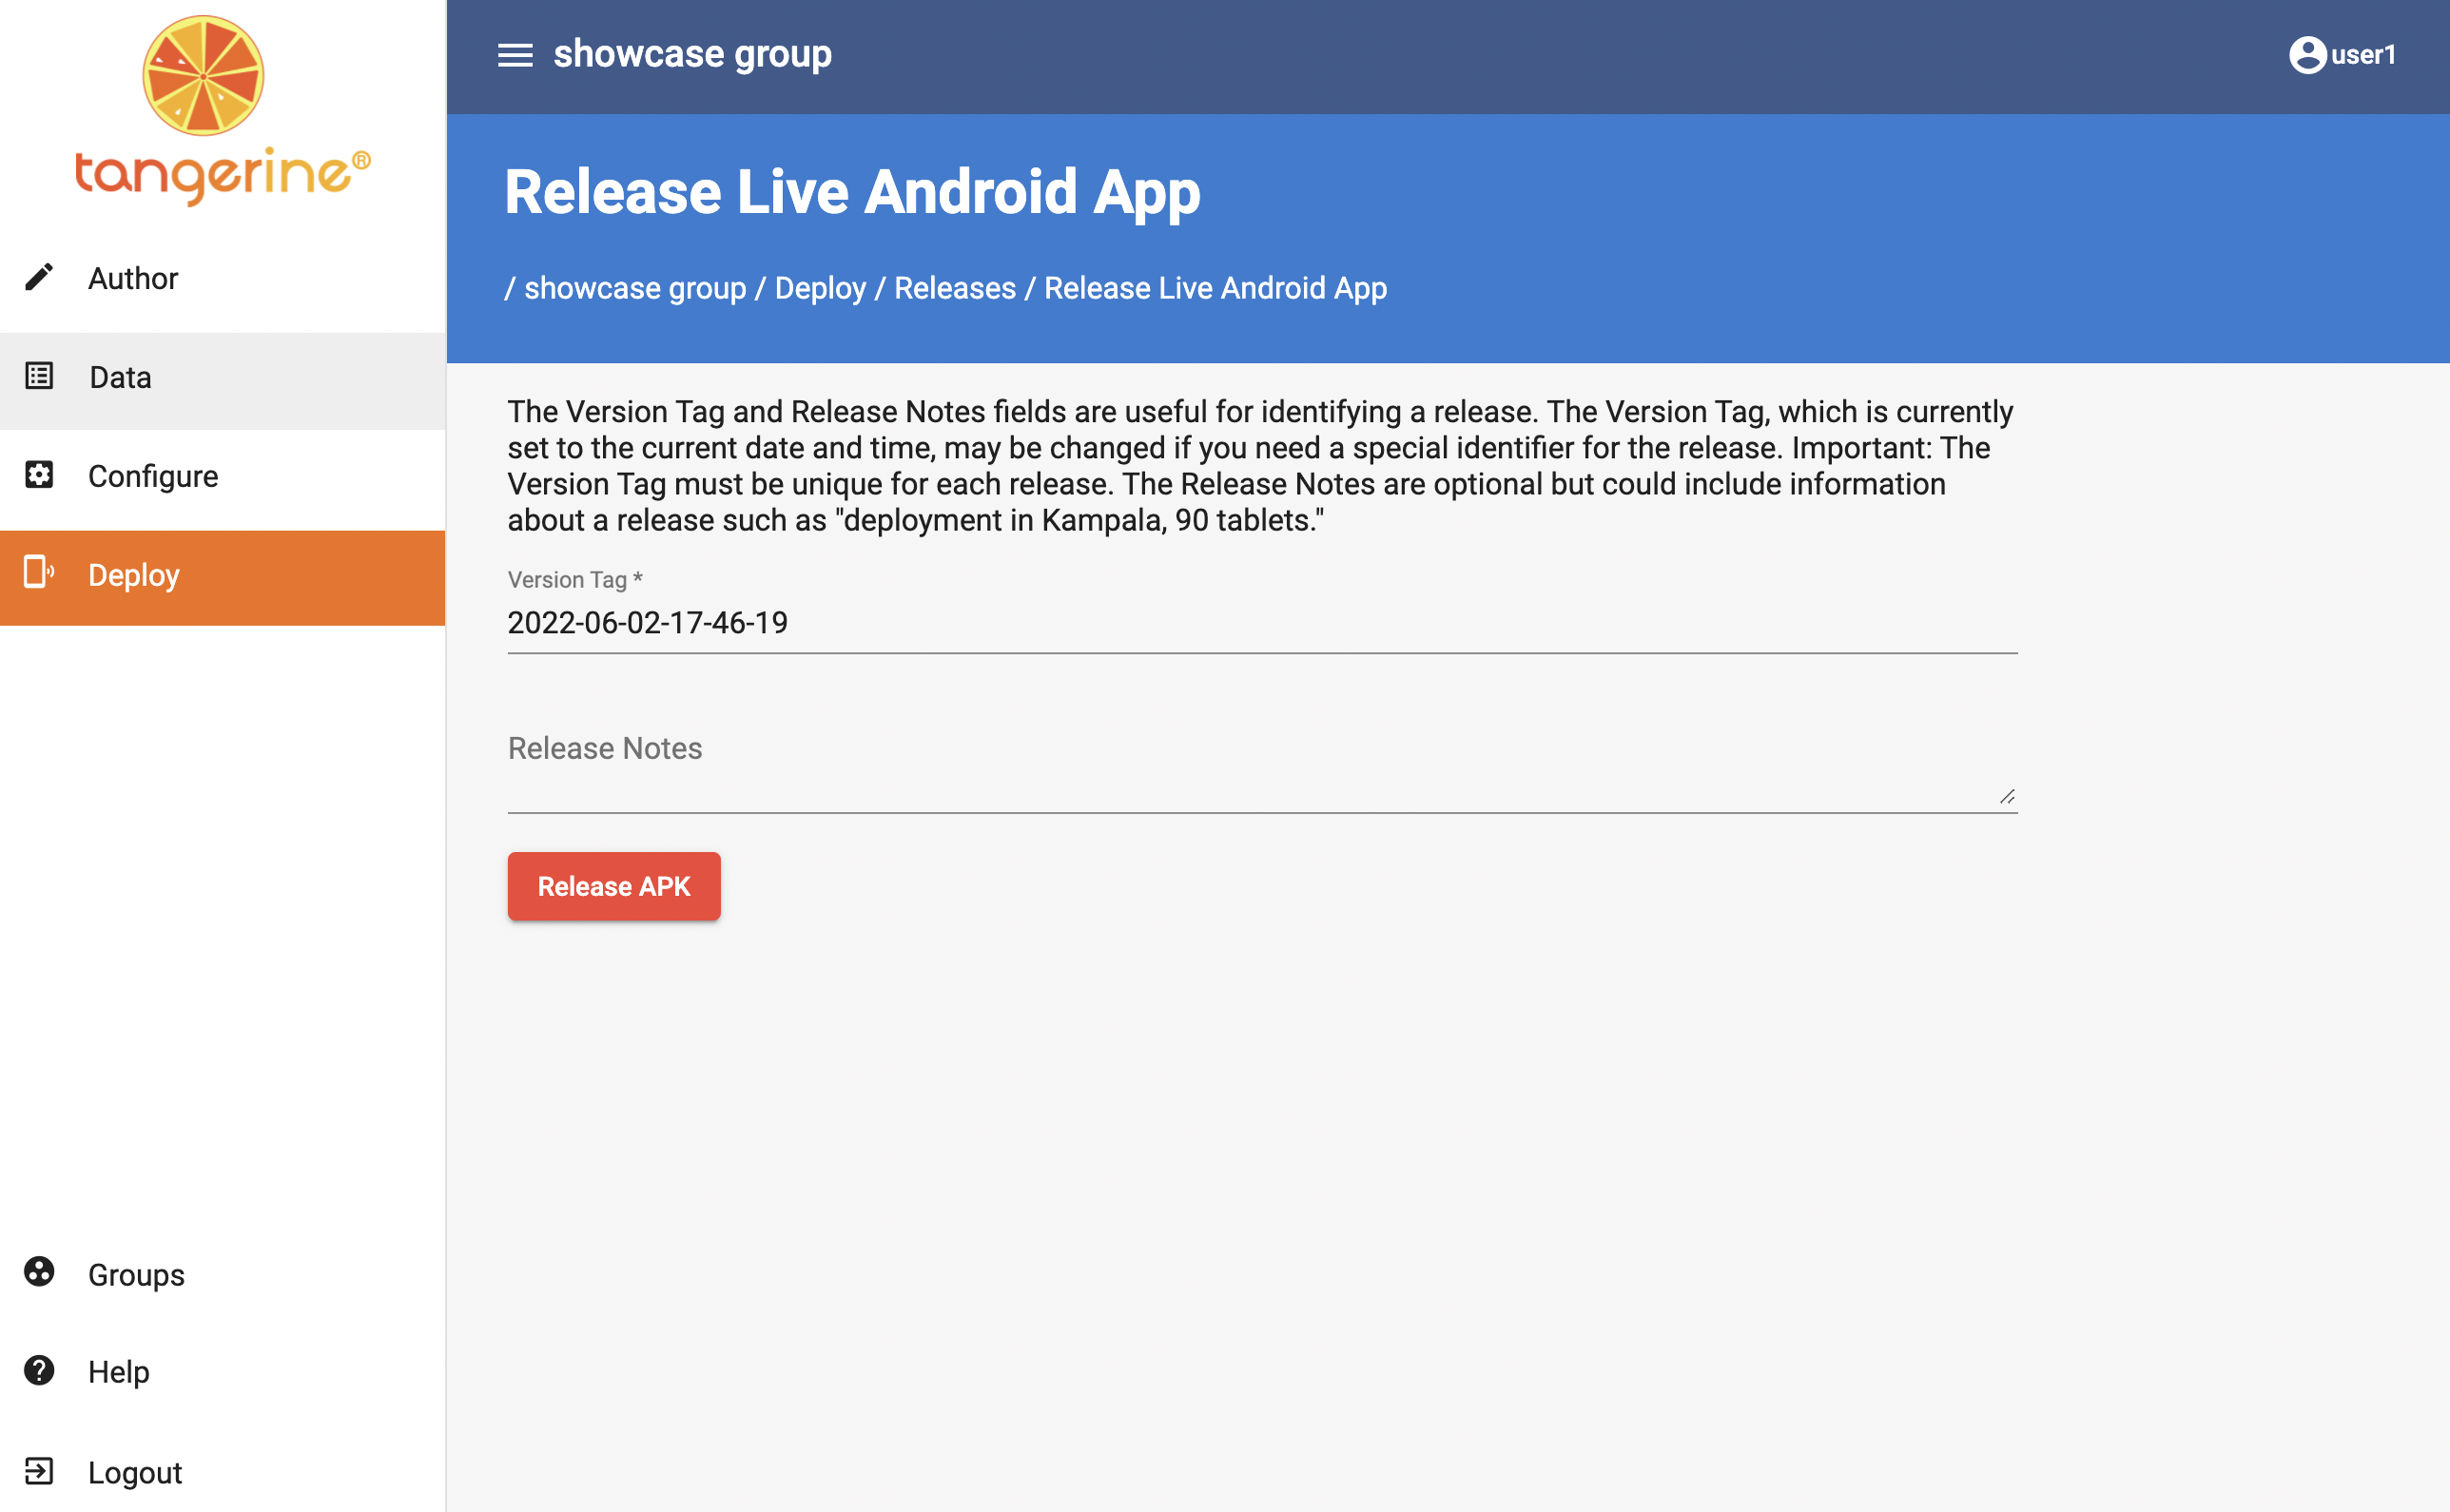
Creating a deployment release is the last step before your app can be used on a tablet. Go to your group and click Deploy->Release Offline App and click the Generate Live Release under Android installation. On the next screen you can enter some additional information of your deployment. The Version tag is what the tablet user can use to make sure they have updated their tablet (this can be seen under the About page on the tablet)
You can change the default release tag and add some description to it. If your group has the historical APK feature enabled, this information will be visible in the listing of historical releases. I will leave the default date and time as my version tag. Now click Release APK
Wait.
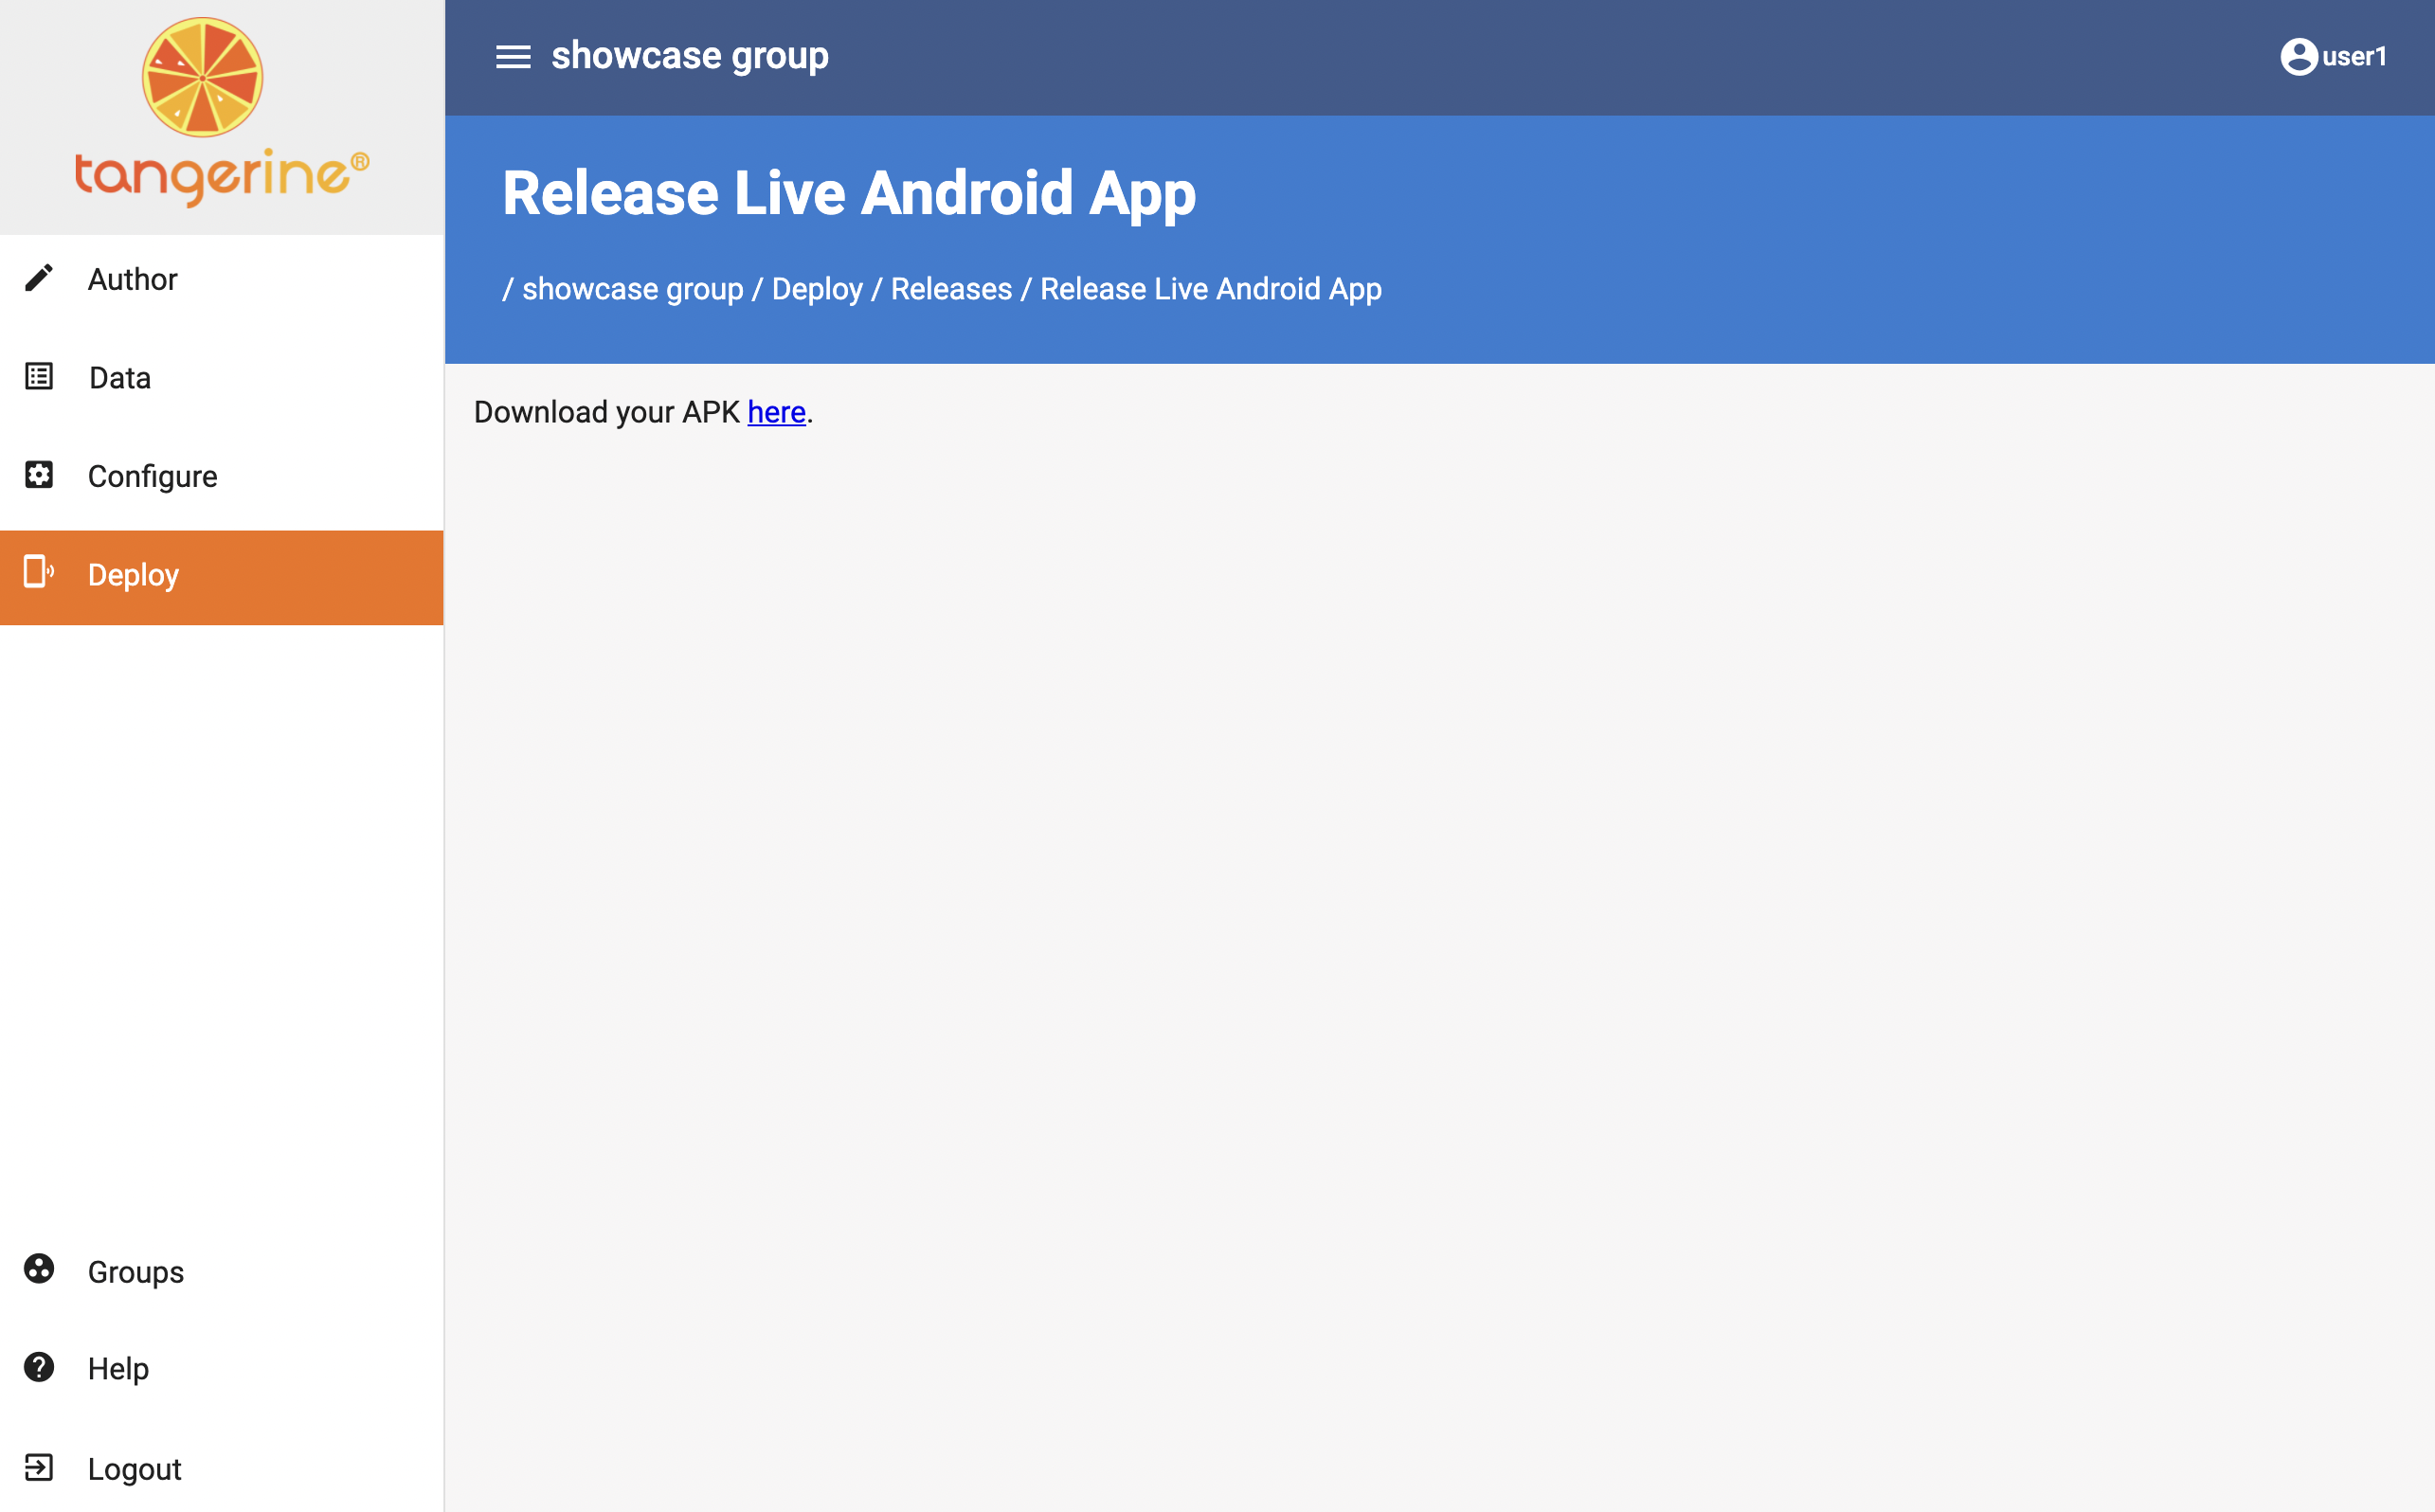
The process of building the apk can take a couple of minutes. Please be patient and don't navigate away from the page. Once it has completed you will see a screen like the one below presenting a link for you to download. YOu can now download this APK file and install it on a tablet.
Using the same steps you can create a Test release. We recommend that you use Test releases only for testing purposes and always install live releases on data collection tablets. This is true even for your assessor's training. Once you install a Live release on the data collector's tablet you will be able to push updates to this tablet.
Warning
Every time an instrument/form is changed, added, or deleted from the group, it is necessary to create a release and alert each tablet user to use the "Check for Update" option in order to update their application.
Web Browser Installation
This deployment strategy creates a link/URL to a "progressive web app" (PWA) for direct installation from the web to the Android tablet or smartphone. Click on Web Browser Installation Test Release/Live Release. Wait.
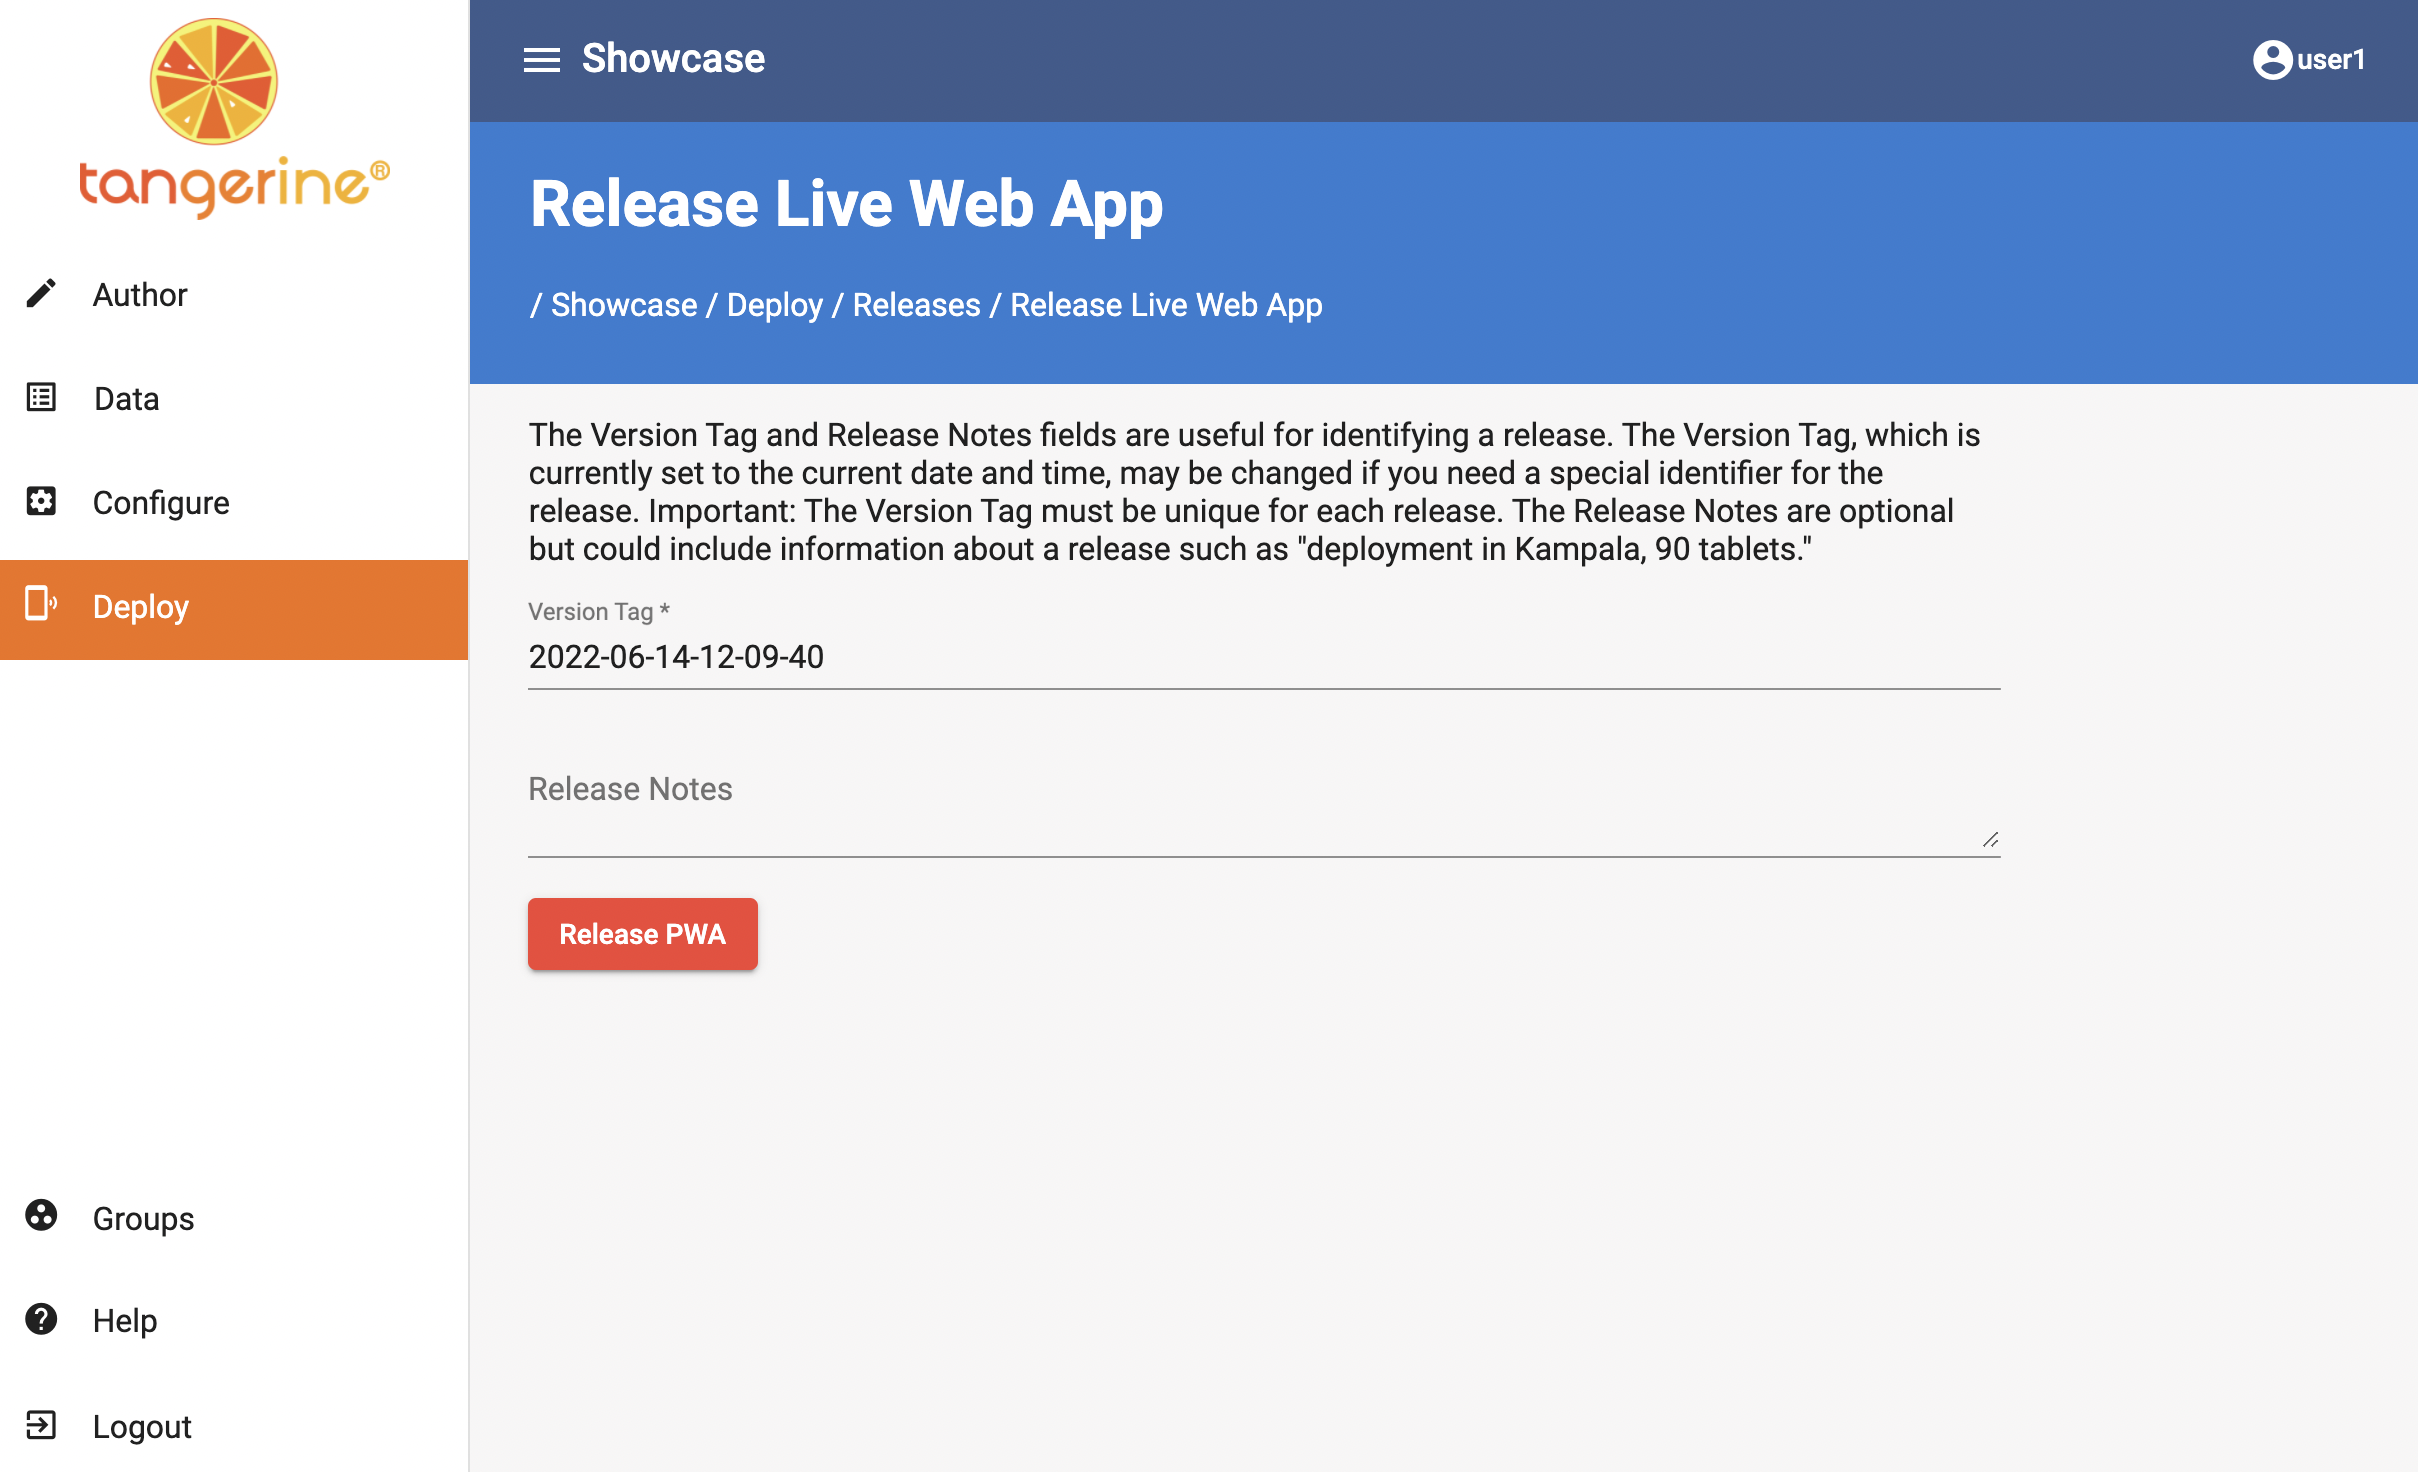
Creating a deployment release is the last step before your app can be used on a tablet. Go to your group and click Deploy->Release Offline App and click the Generate Live Release under Browser installation. On the next screen you can enter some additional information of your deployment. The Version tag is what the tablet user can use to make sure they have updated their tablet (this can be seen under the About page on the tablet)
Note that you should only install 1 application in 1 browser otherwise unexpected conditions may be created. We use the Chrome's Persons option to create a profile for each group that we have in Tangerine. Doing this ensures that your group's data stays isolated and your app always works. Learn how to create Chrome Persons here
You can change the default release tag and add some description to it. If your group has the historical APK feature enabled, this information will be visible in the listing of historical releases. I will leave the default date and time as my version tag. Now click Release PWA
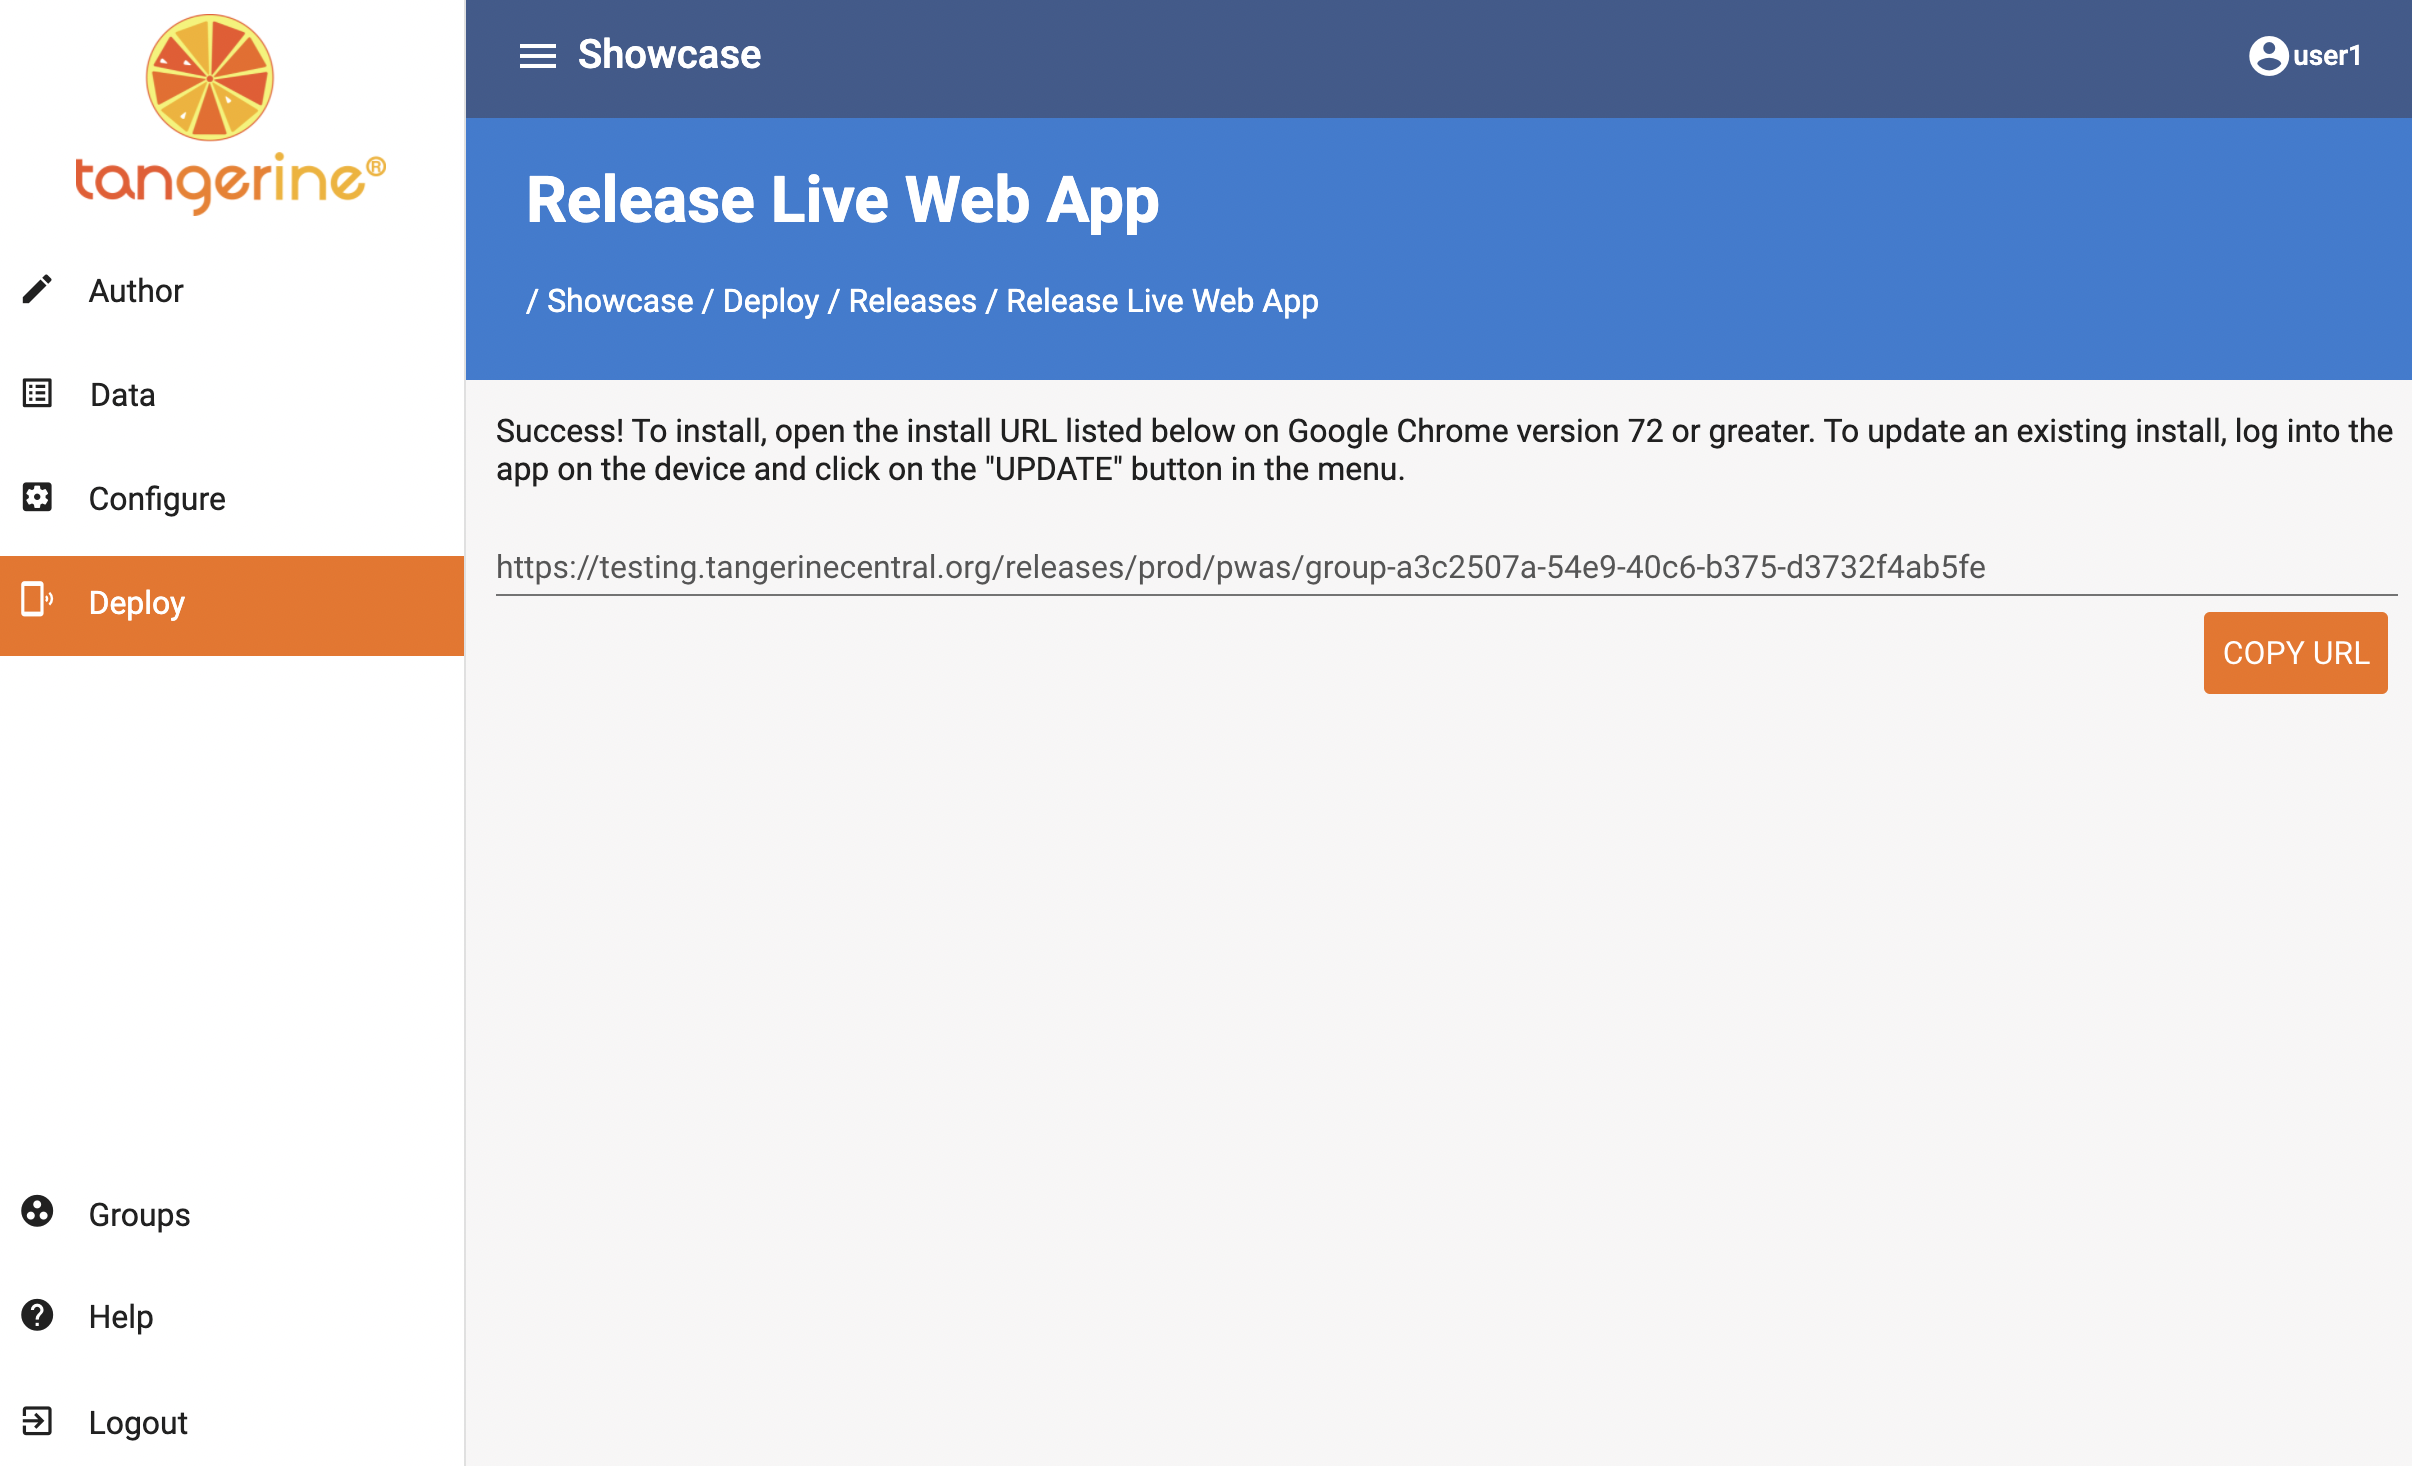
The process of building the PWA is very quick. Once it has completed you will see a screen like the one below presenting a link for you to copy. You can use this link and install the Browser Release on a tablet, or inside the Chrome or Edge browsers on any Operating System
We will discuss how to install the browser release in Browser/PWA Installation topic
Using the same steps you can create a Test release. We recommend that you use Test releases only for testing purposes and always install live releases on data collection tablets. This is true even for your assessor's training. Once you install a Live release on the data collector's tablet you will be able to push updates to this tablet.
Warning
Please keep in mind that the Browser/PWA release requires an internet connection to be installed on a tablet or browser on a computer. The installation must be done correctly for the app to be accessible offline. Refer to our Browser/PWA Installation for more information.
Warning
Every time an instrument/form is changed, added, or deleted from the group, it is necessary to release the apk/pwa again, but NO NEW INSTALLATION is necessary on the tablets. Instead, instruct Tangerine tablet users to connect their tablets, select their profile page (3 vertical white dots on top right of tablet screen).
Warning
This update approach will not only apply any instrument/form edits, new forms, or form deletions, but also any updates to the Tangerine application made in the meantime and applied to your group (if any).
Create an Online Release
Creating a deployment release is the last step before your form can be filled in on a tablet or a computer. Go to your group and click Deploy->Release Online Survey. Here you will see a list of forms that have been publish and those that can be published. On the image below we see that one form is listed under Published Surveys and other forms are under Unpublished Surveys.
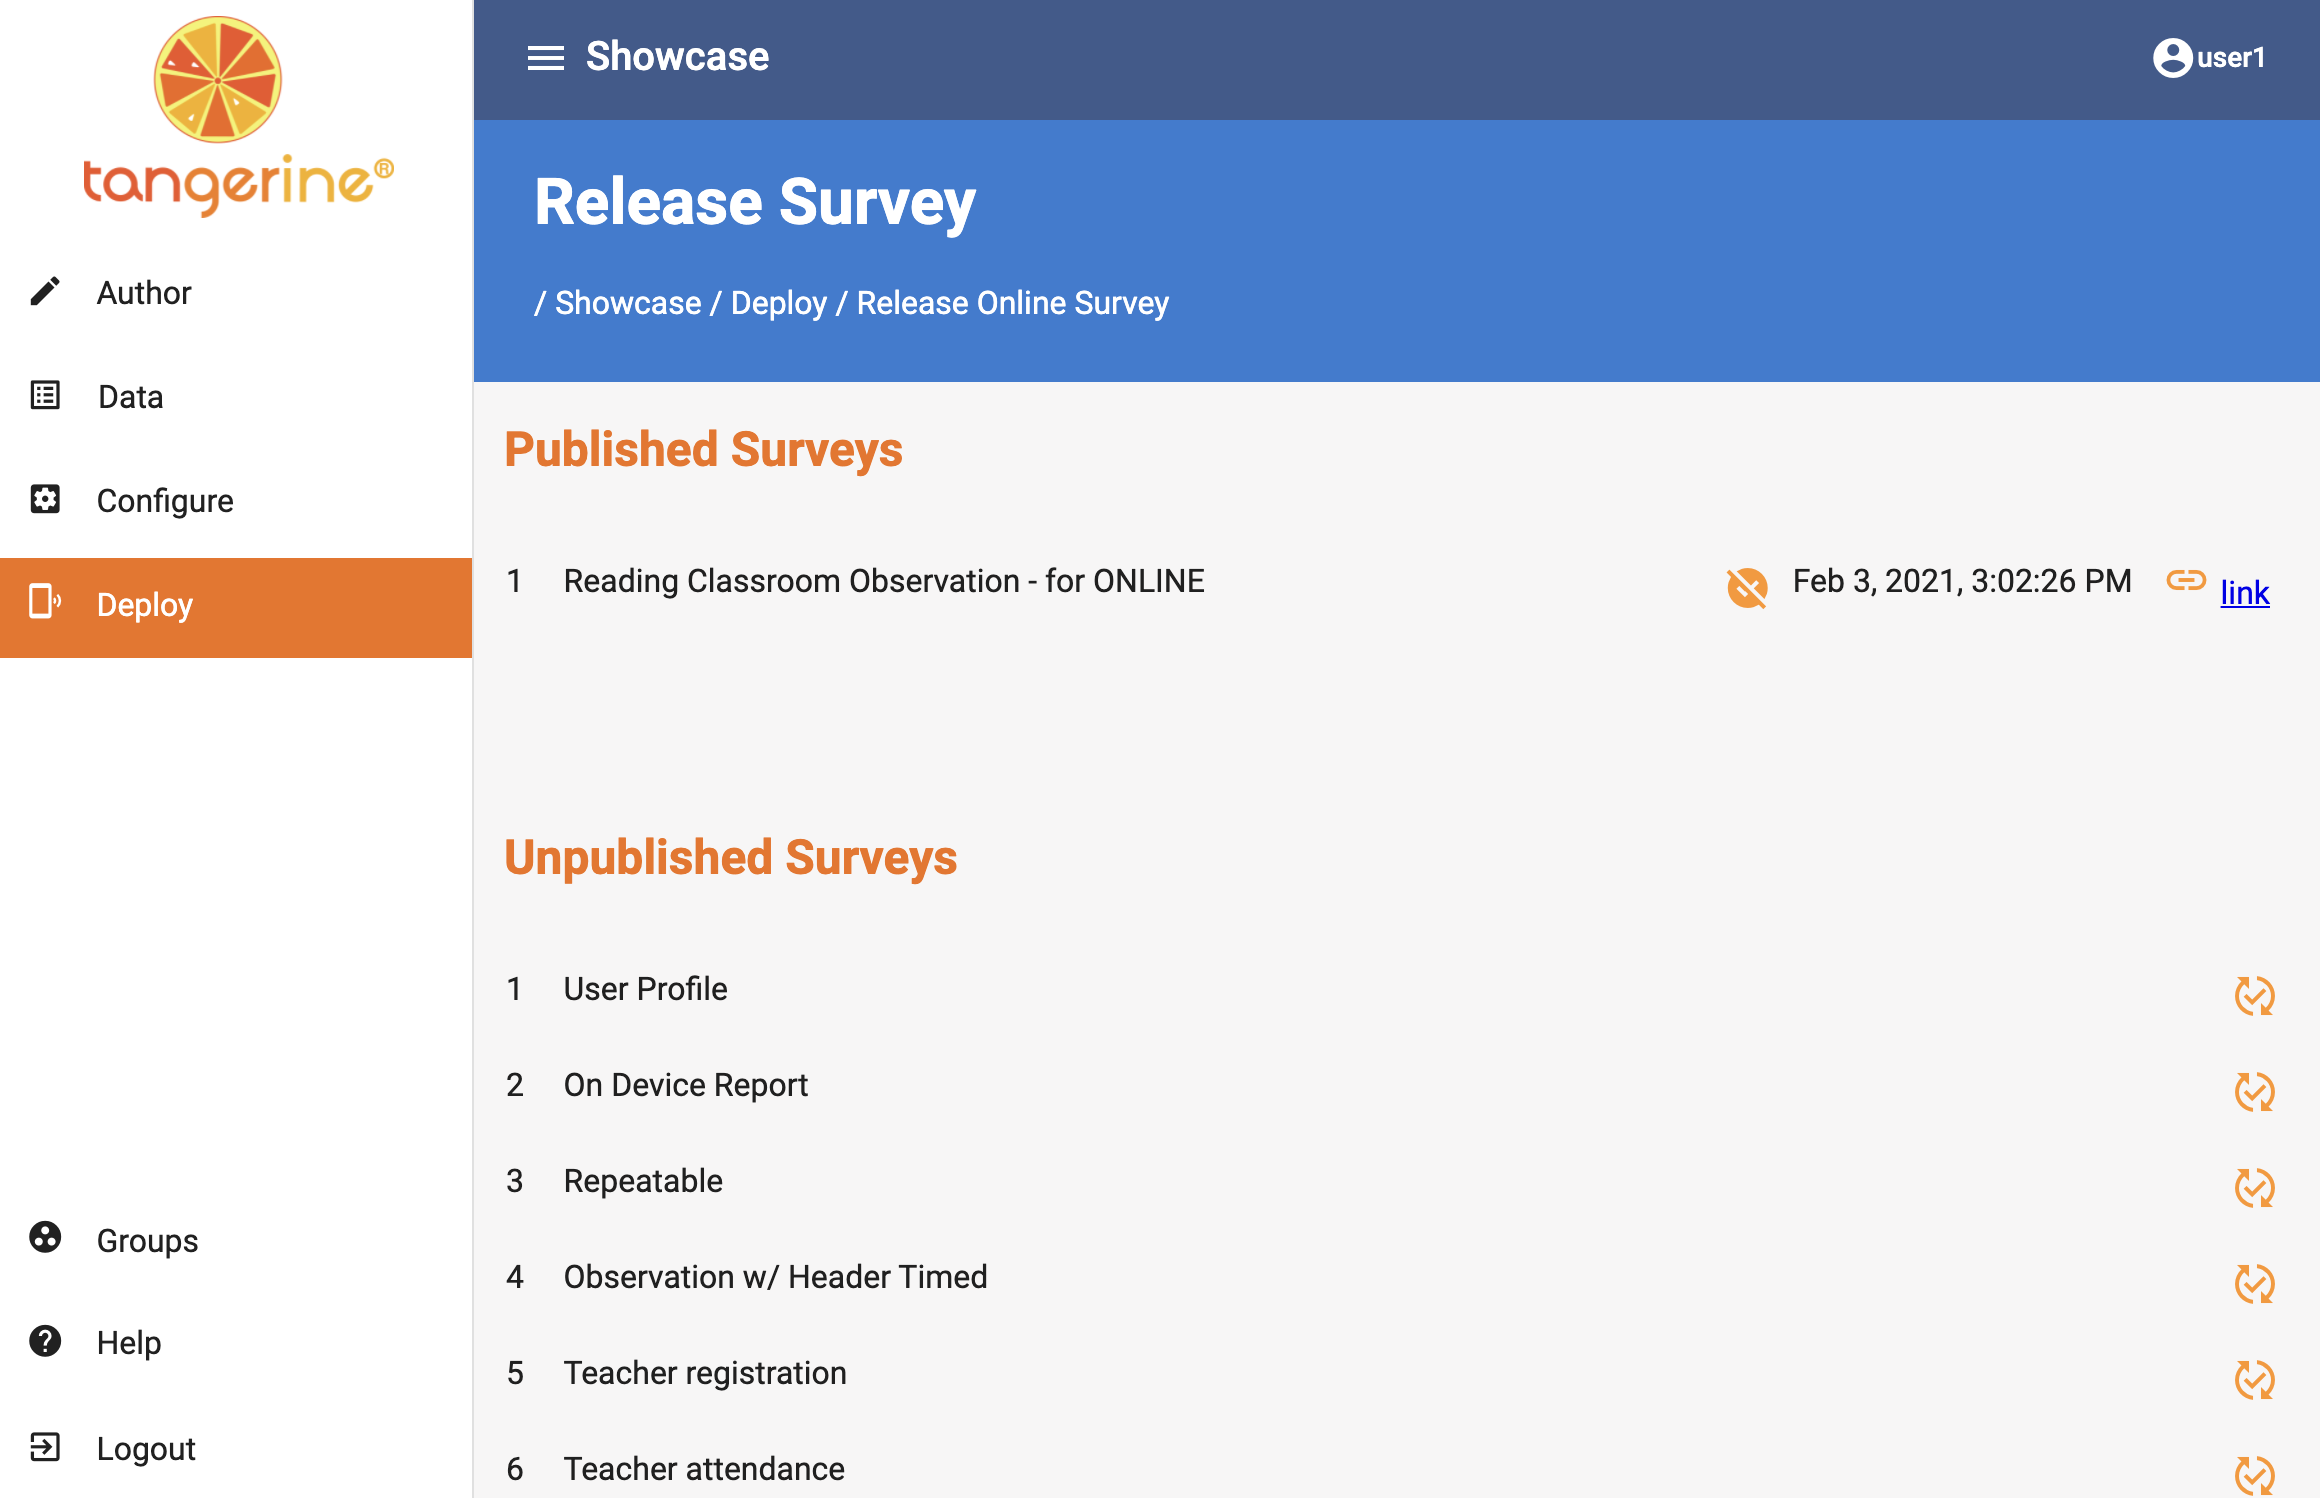
To publish a form click the check mark icon beside it on any of the forms under Unpublished Surveys.
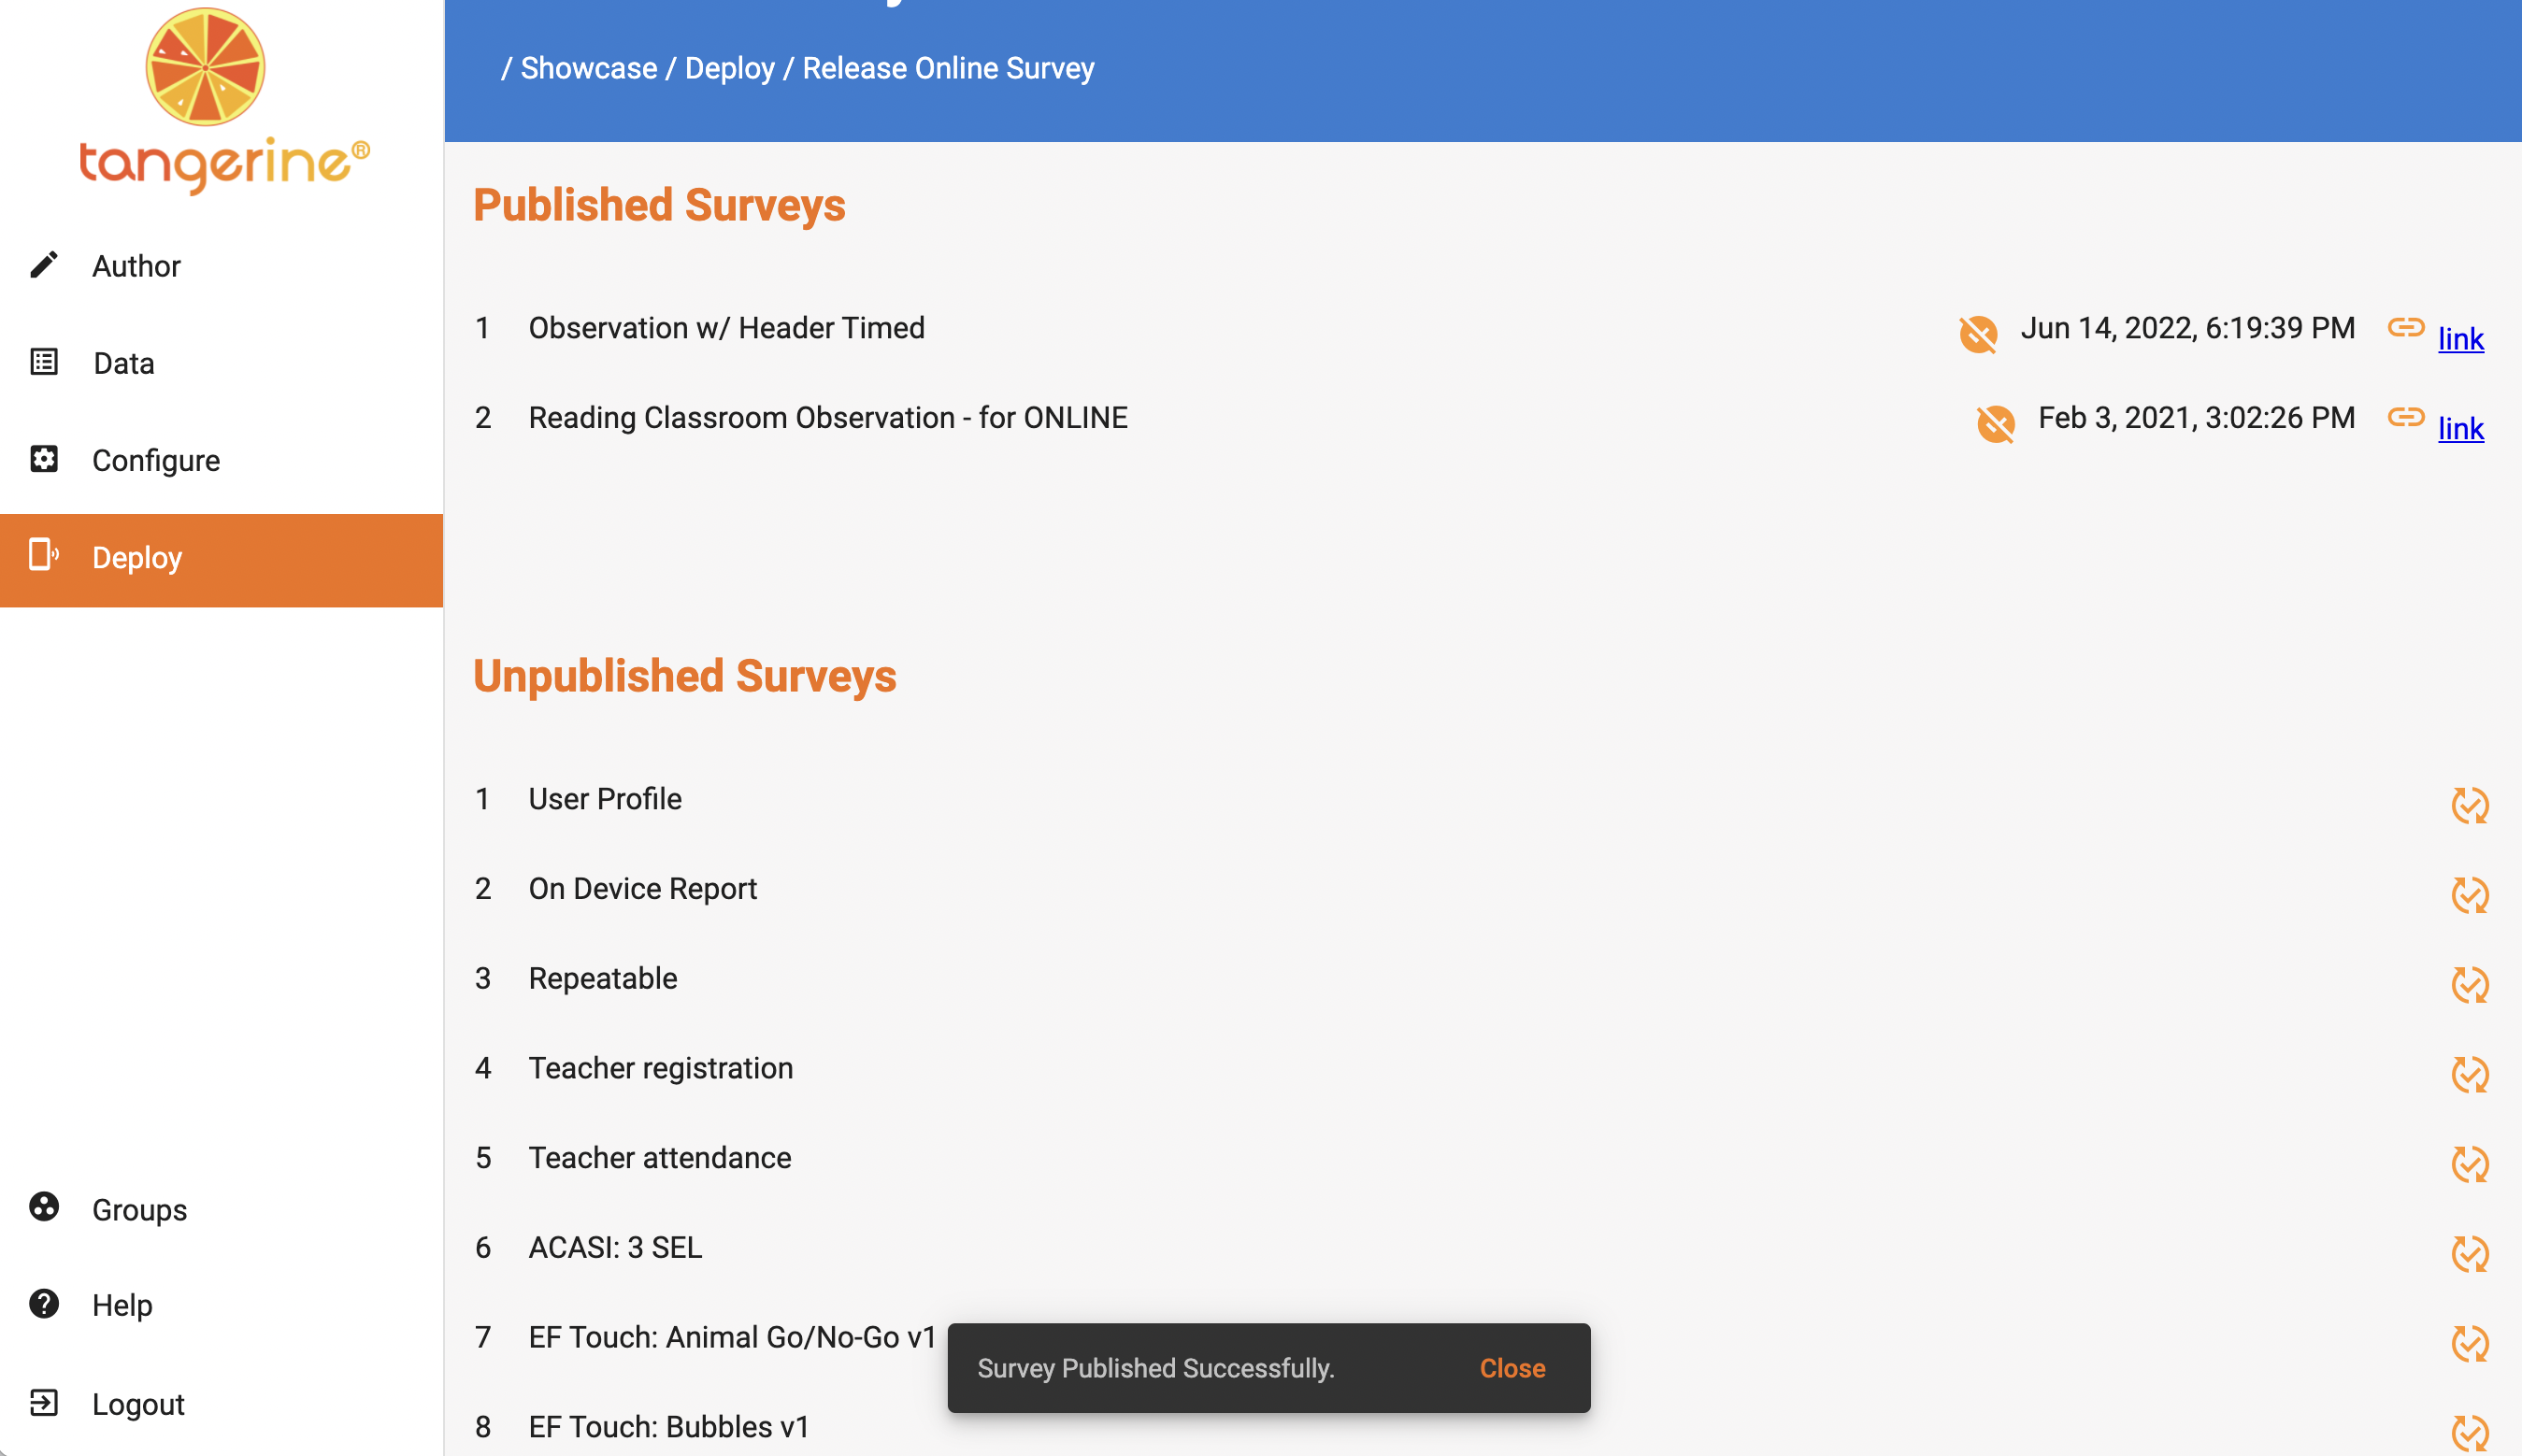
Clicking on this icon brings that form up to the Published Surveys section and you can see the form's name plus some other info and actions on the right hand side. Those are: an icon to unpublished the form, the date of publishing, and the link to this form
Right after you publish a form you will also see a message at the bottom of the screen confirming your action.
To unpublish a form, click the icon beside it. This will take the form down to Unpublished forms and the link will no longer be available for this form to be filled in.
Warning
If you have made any changes on your form, you must unpublish it and re-publish it in order for those changes to be visible in the form's link.
To share your form for data entry, copy the link from the Published Survey listing and send it to your data accessors Note that the online survey can be opened only on Chrome, Edge, Safari, and later versions of Firefox.
Creating Releases Video
Using APK Device Setup Installation
- Connect the tablet to WiFi (or connect direct to network using a SIM card)
Note: here you can also copy the file from your computer to the tablet using a cable
- Download the APK file to your tablet and tap it to install. You can also copy the APK file to the tablet with a cable
Note that here you may get a warning for enabling Unknown Sources. This setting allows you to install an app coming from outside the Play store. Please allow this in your settings.
The instructions below are generic and they may differ for your version of Android.
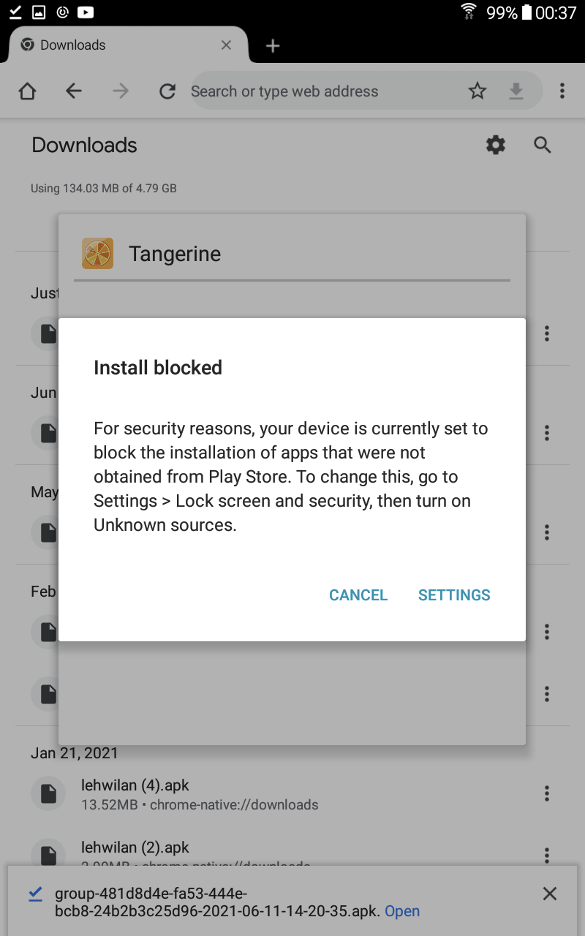
- If you receive the blocked install message like in the image below click Settings to enable Unknown Sources. Tap the Settings button
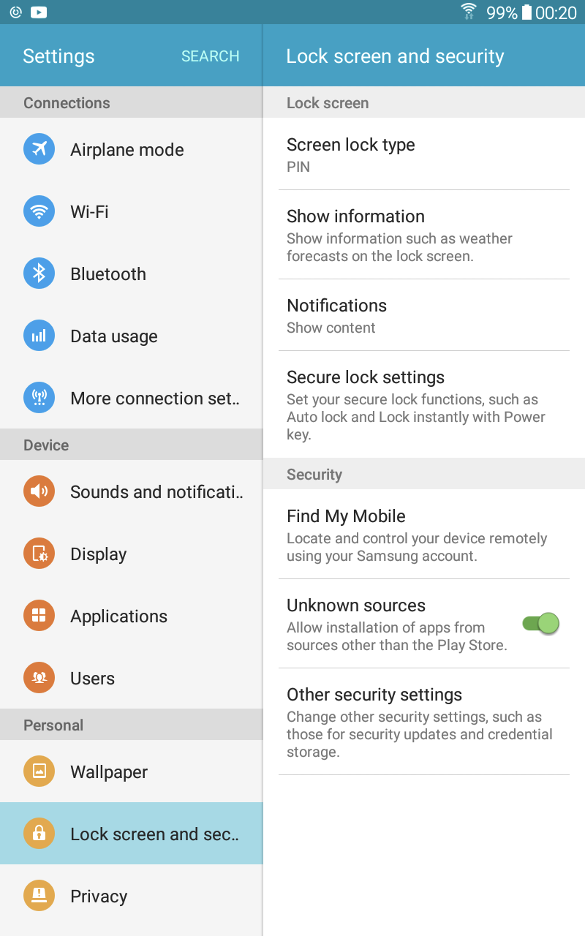
Make sure you select the Unknown sources
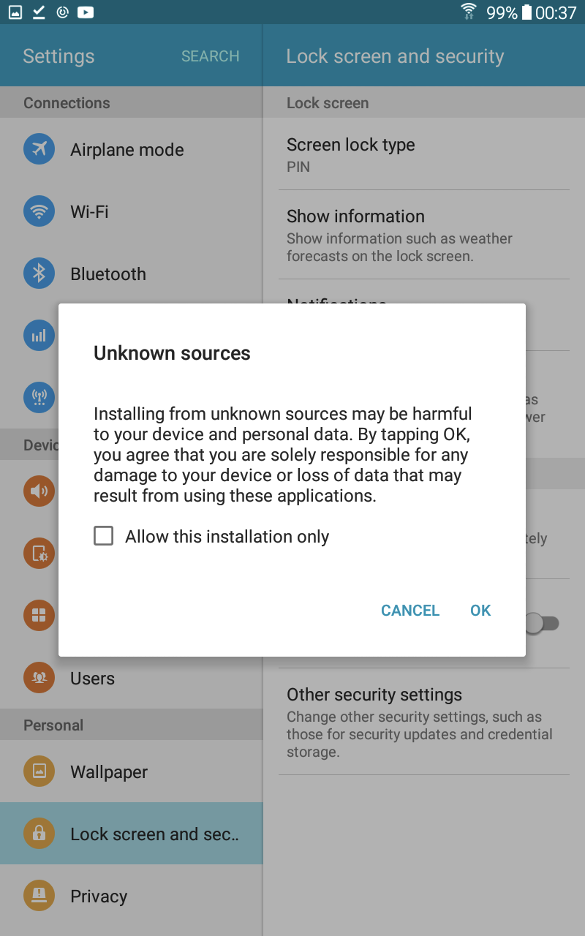
Click OK to Confirm
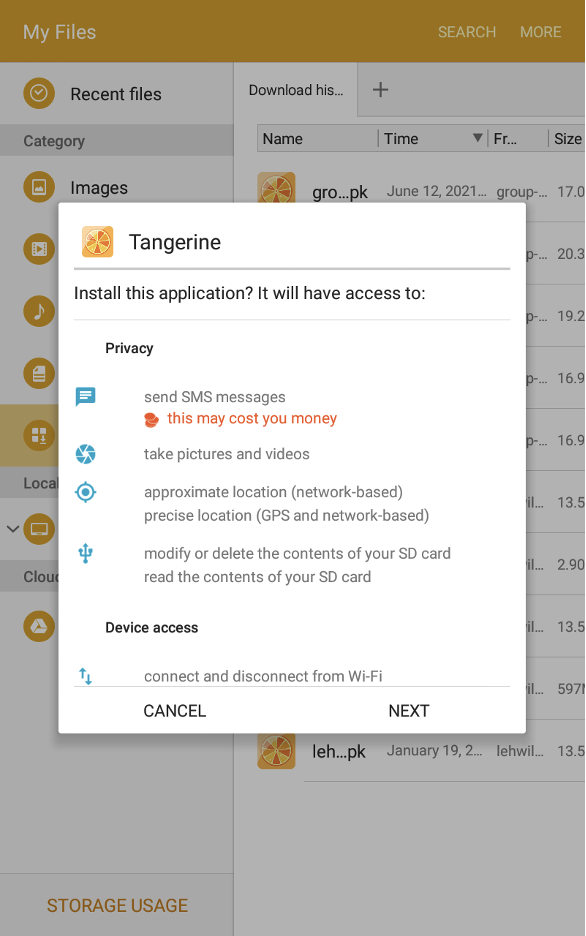
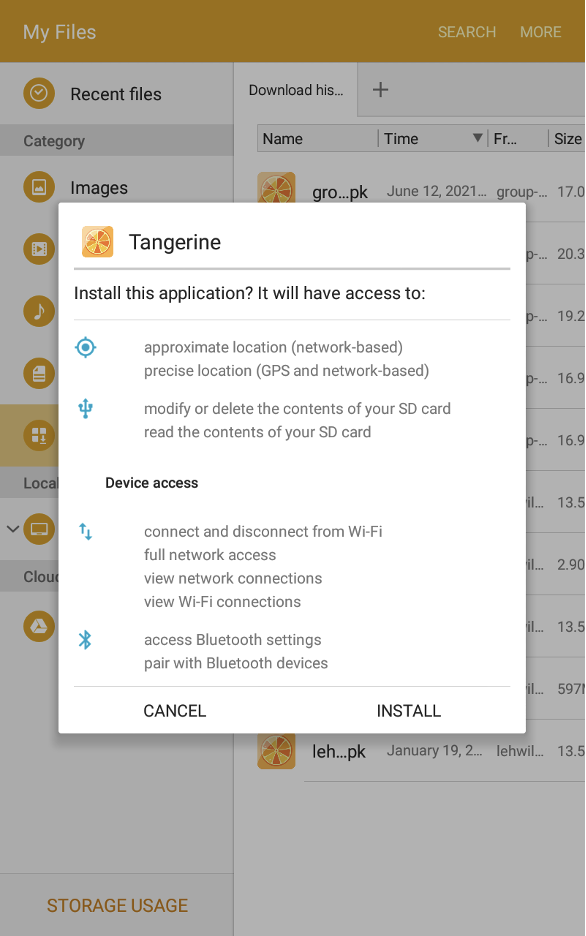
To continue with the installation note all different permission Tangerine needs. We are making user of the GPS location, and contents on device – this one is for data export.
SMS is used only if configured in your forms to send an sms
Taking pictures is also used only when configured in your forms
Click Next
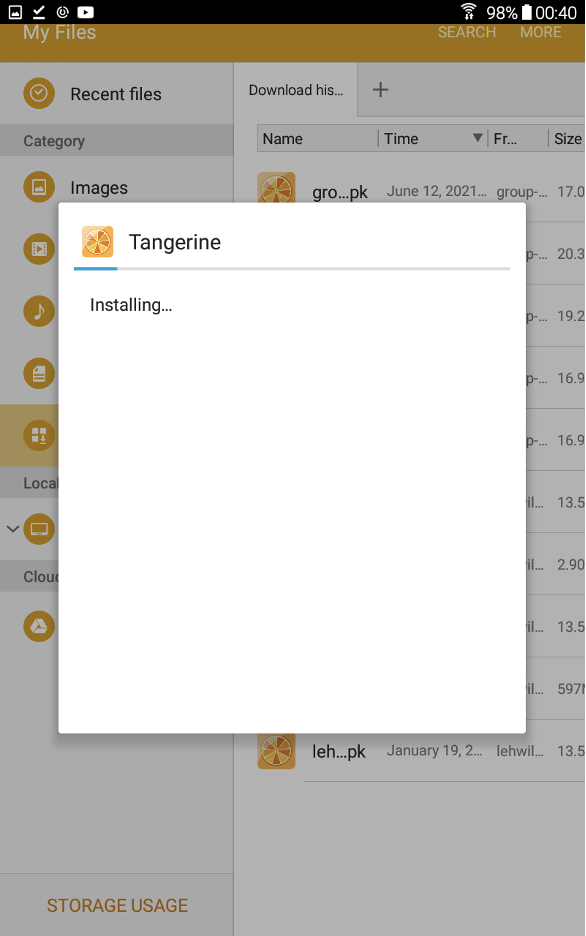
Click Install
Wait for the installation to complete
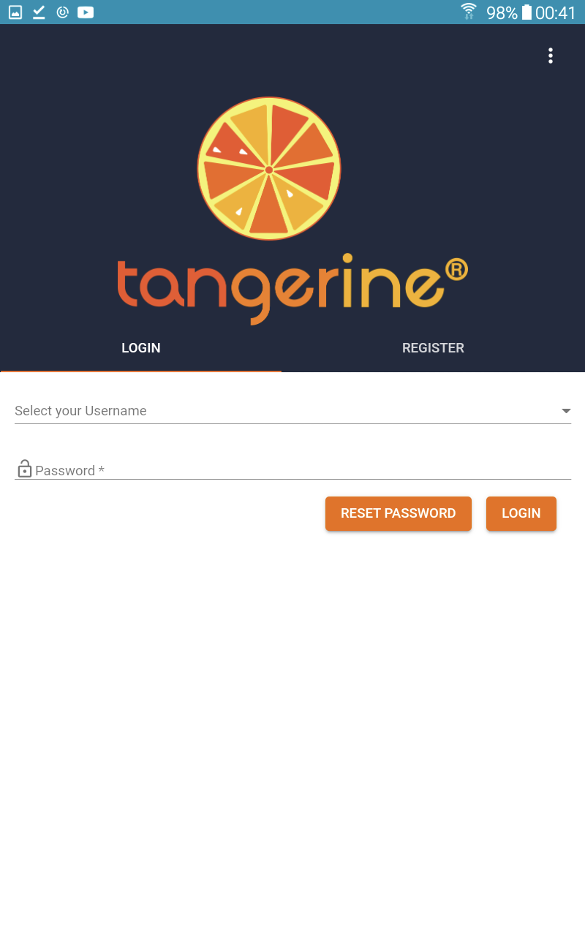
Now you have the app installed. you can find it in the app drawer or your main screen.
To open the app click Open

The app is now installed. You can proceed and Register a user. In general we let the data assessor go through the registration process and create their username and password. Note that more than one users can share a tablet.
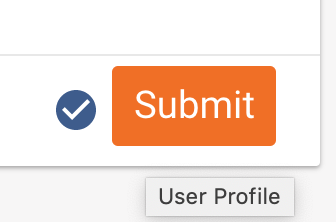
Fill in your information and click Submit 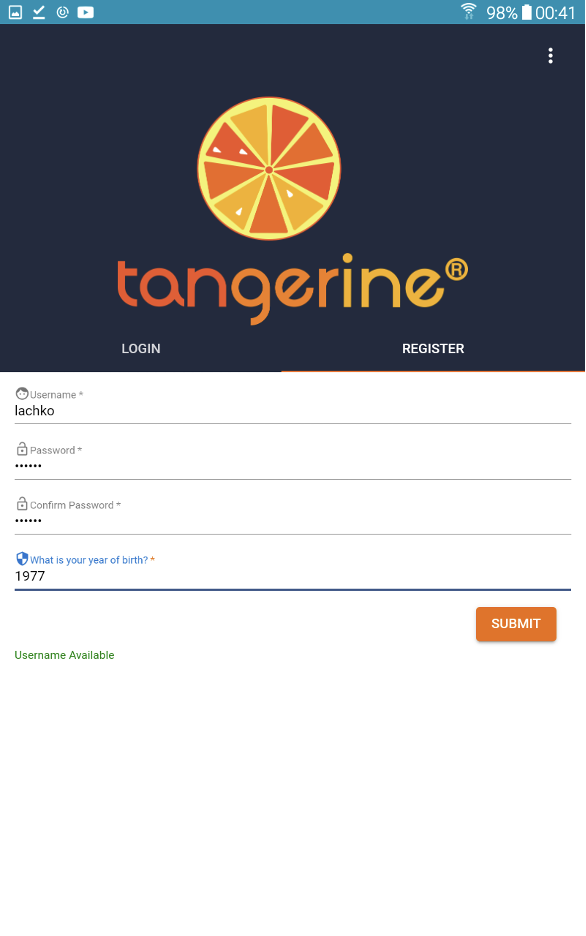
The next step is to create your assessor profile. All of the data on the user profile(Assessor/ Enumerator profile) is attached to each form collected on this device
Enter the information presented on the user profile page and tap Submit
You are now free to use the app
Using Device Setup Installation - 2 way sync setup
Installation
Tangerine offers two deployment /installation strategies, Android installation or web browser installation:
-
Android Installation. This is the standard deployment package where an actual apk file can be generated on the computer, downloaded, and then copied over to a mobile device via a USB cable and installed. This method of deployment is suitable in slow network environment or when the apk is large.
-
Web Browser Installation. This deployment strategy requires an Internet connection on the tablet for the Tangerine to be installed. Once installed, the app can work again offline. This method is suitable in places of good connectivity. This method of installation can also be used for installing app on your Chrome browser on a PC or laptop
For both of the installation models you will need a Registration Code (QR Code) or a device ID and Token. If you don't have this information you will not be able to install the application on your device.
We recommend that the initial device setup is done by a responsible person at the site. This can be someone who will handle queries regarding Tangerine or an IT staff. Each device registration requires that an admin user is create on that device. This admin user is the one that can authorize the registration of a user account. This is to make sure that your data can only be accessed by authorized personnel and no untheorized accounts exist on the tablet.
Installation on a tablet/phone
Copy the apk file to the tablet and open it. Follow the installation prompts until you receive a message that the app has been installed. Locate the Tangerine app in the application drawer and click it.
Warning
Note that you must be online on the tablet to do the initial installation.
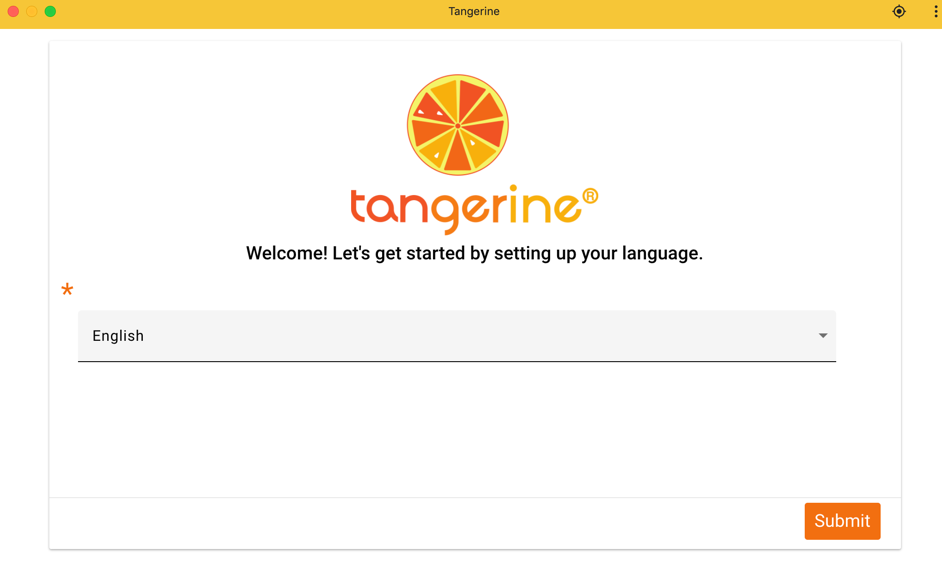
The first step is to select the language for the user interface
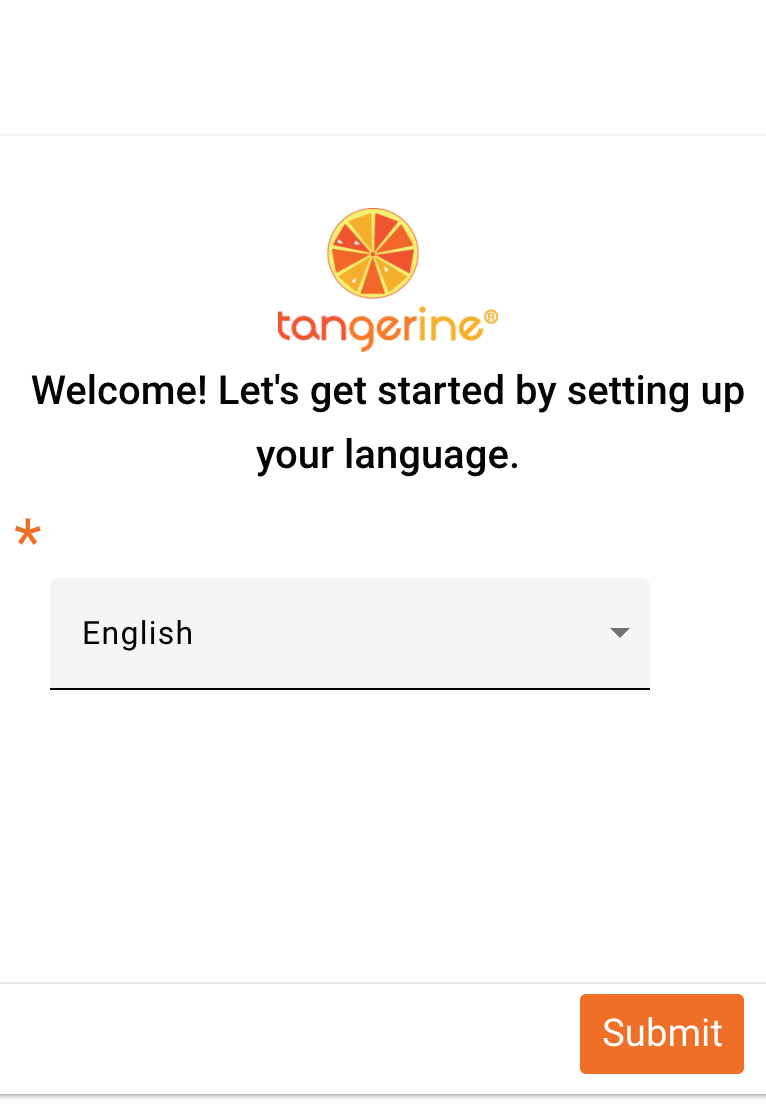
Select the language and click Submit
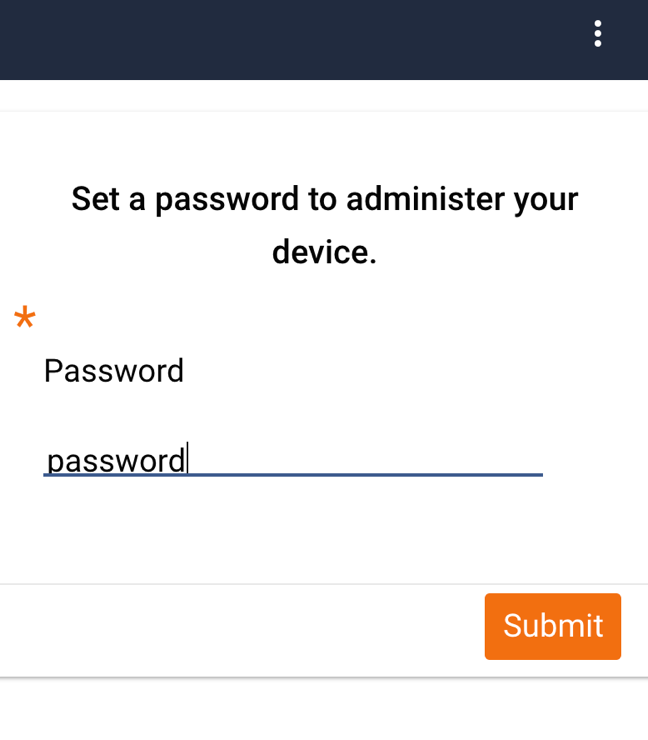
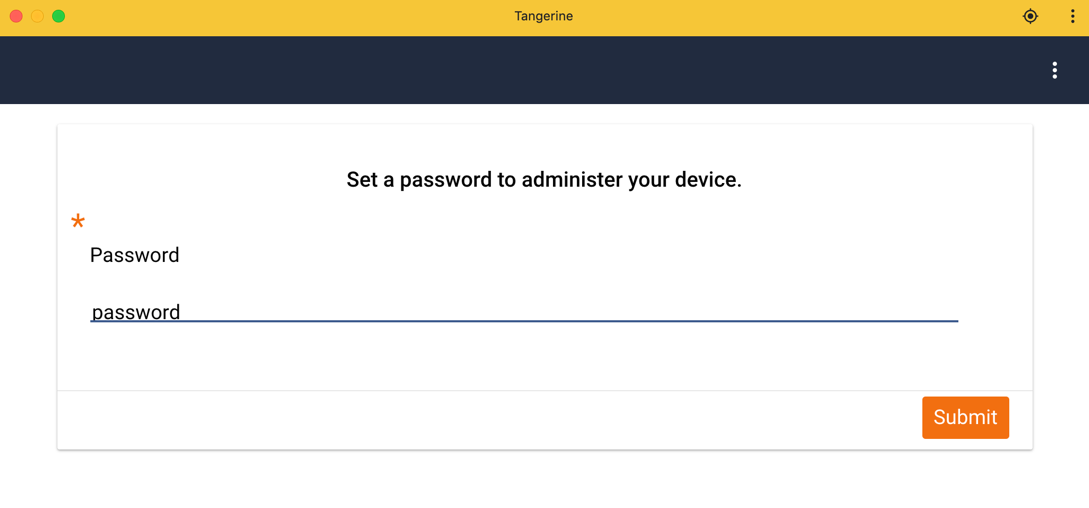
Now enter the administration password for this tablet. You may wish to use the same admin password for all tables at your site. This same password will be required each time a user is registering to use the app on this device.
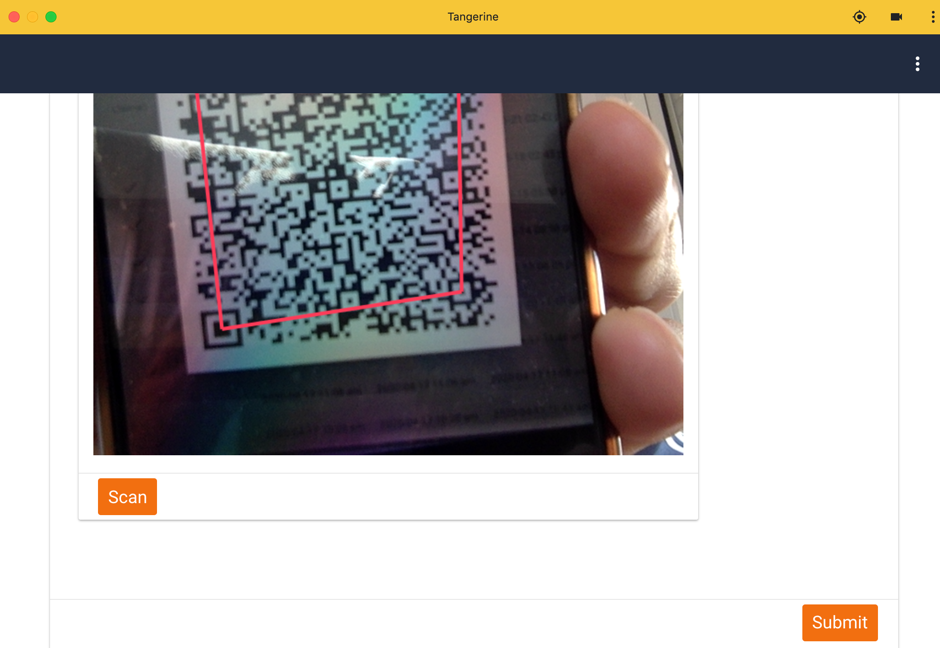
Select Yes if you have a device code or No if you are going to insert a device ID and Token for the registration.
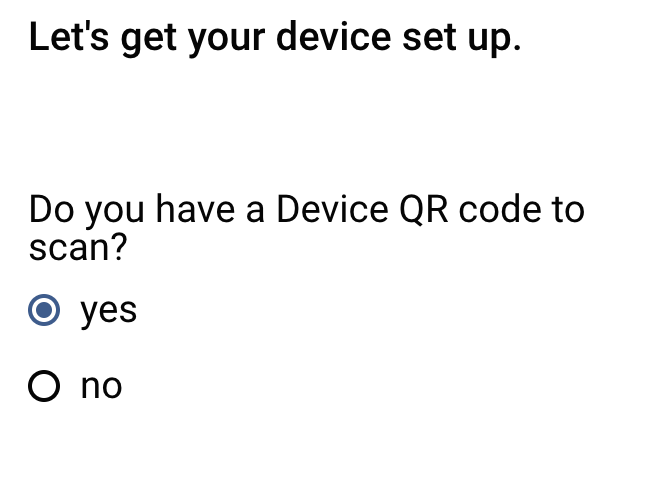
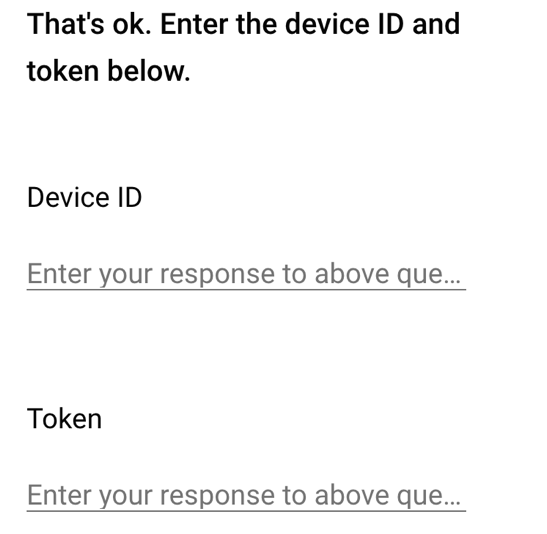
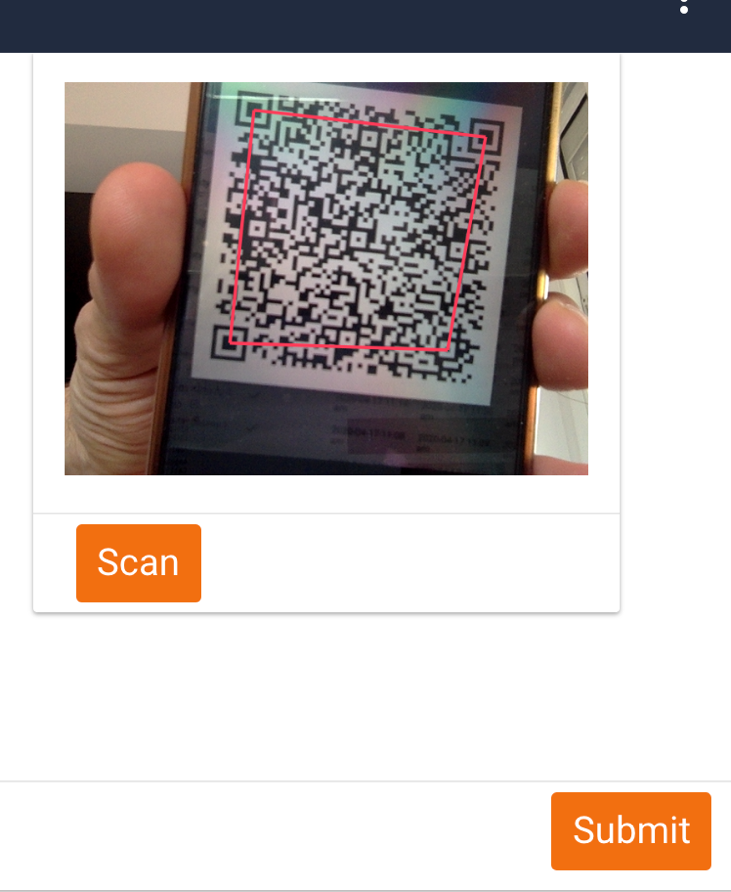
Insert the ID and Token or click the Scan icon to scan the registration QR code.
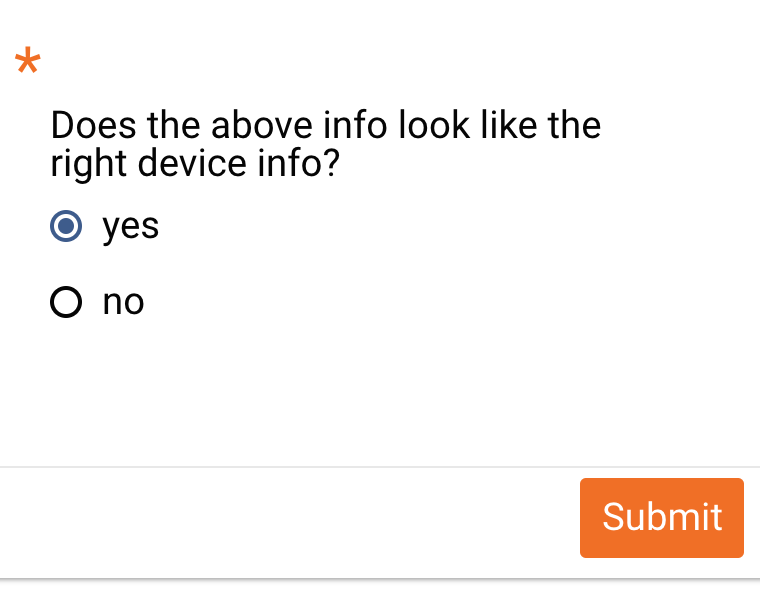
Click Submit when done. The next screen will show you some information for this device. If it is correct select Yes, if the scanned device code and ID correspond to a different device select No and start over with the correct device code.
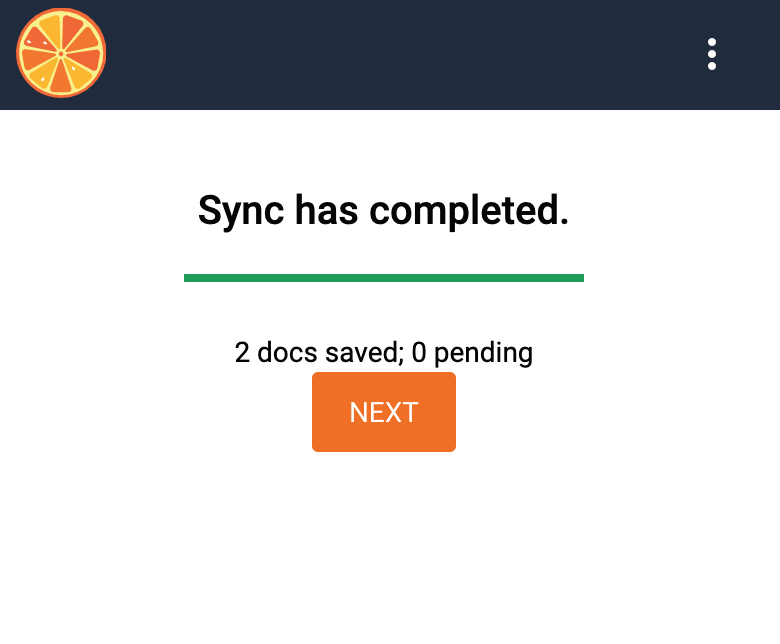
On the next screen you will see some synchronization information. The app at this moment is contacting the server and obtaining users assigned to your device location. If you have already collected data on another tablet for this location, this data will also be pulled.
Click Next and then go to the Registration tap. Ask your administrator to enter the admin password and enter your user information below. Click submit when ready.
If you are an administrator handing off the tablet to a user, enter your password and ask the user to enter their username and password. Here the Year of Birth can be used by the user to reset their password in case they forgot it.

On the next screen you will see a dropdown of all users for this location. Select the one that corresponds to you and click Submit.

You will now see a screen similar to the one below where you can start working
Installation in your Chrome browser
Tangerine can be installed and used offline in the Chrome browser. To do this we follow similar installation instructions as above.
Warning
You must be online on to do the initial installation.**
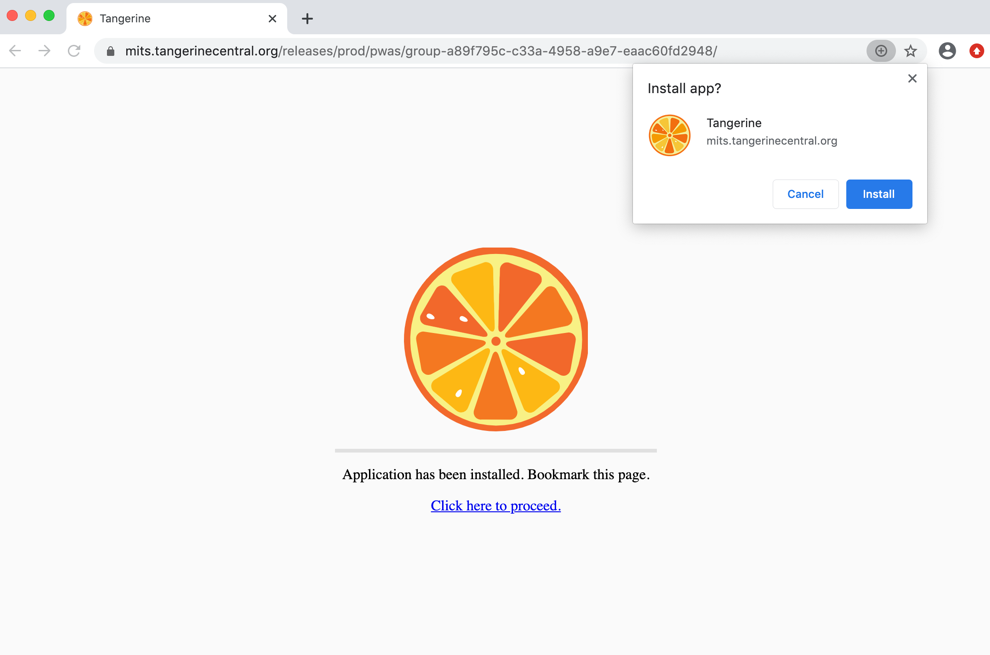
The first step is to follow the link for Browser installation that has been given to you or copied directly after it's generation in the backend. Copy the link and paste it in the Chrome's address bar. You will see a screen indicating that the app is being installed.
After a successful installation you will receive a confirmation screen like the one below. Do not click the link to proceed.

Click the + icon beside the address bar to install Tangerine in your browser. A popup will open to give you the option to install the app. Click Install
Depending on your browser setup, you may be asked to create a shortcut on your desktop or in your program folder or the browser may close automatically and offer you the link for Tangerine to open. If you see the link click it
If you cannot find it type this into the address bar of your browser: [chrome://apps/]{.underline}
Warning
Always start Tangerine from the application icon and not from the URL address. Only one Tangerine instllation per browser profile is allowed.
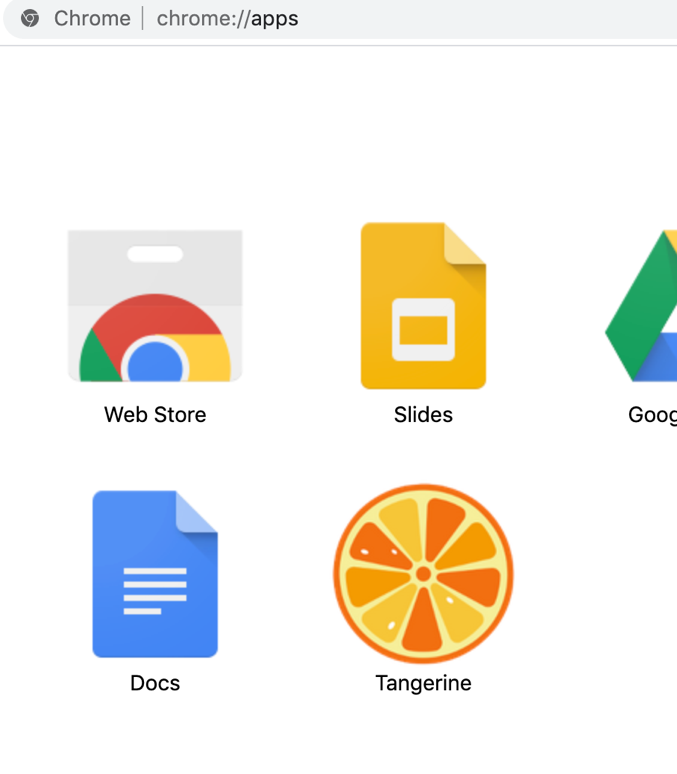
Click the Tangerine app to start the application.
Select the language and click Submit
Now enter the administration password for this tablet. You may wish to use the same admin password for all tables at your site. This same password will be required each time a user is registering to use the app on this device.
Select Yes if you have a device code or No if you are going to insert a device ID and Token for the registration.
Insert the ID and Token or click the Scan icon to scan the registration QR code. If your PC or laptop doesn't have a camera that can be used to scan the barcode, you'd have to type in the ID and Token
Click Submit when done. The next screen will show you some information for this device. If it is correct select Yes, if the scanned device code and ID correspond to a different device select No and start over with the correct device code.
On the next screen you will see some synchronization information. The app at this moment is contacting the server and obtaining users assigned to your device location. If you have already collected data on another tablet for this location, this data will also be pulled.
Click Next and then go to the Registration tap. Ask your administrator to enter the admin password and enter your user information below. Click submit when ready.
If you are an administrator handing off the tablet to a user, enter your password and ask the user to enter their username and password. Here the Year of Birth can be used by the user to reset their password in case they forgot it.
On the next screen you will see a dropdown of all users for this location. Select the one that corresponds to you and click Submit.
You will now see a screen similar to the one below where you can start working
Synchronization
User setup
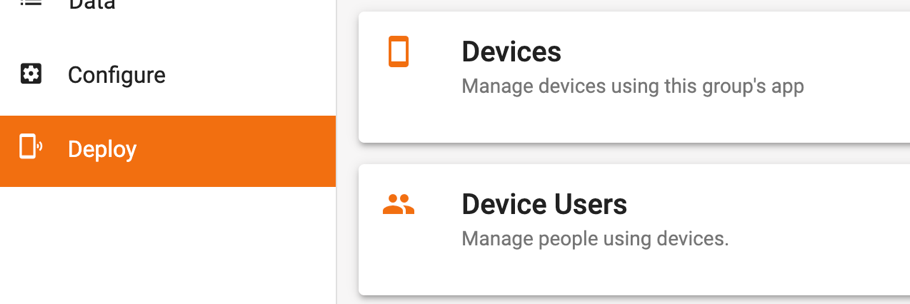
Follow to below steps to prepare the Tangerine backend to allow installation of your app on the user device or Chrome browser. The menu items used during setup can be found under the Deploy link in the left side navigation menu.
Click the Device Users section to create a new tablet user profile. On this screen you will see a listing of all users already created. At the bottom left of the screen there is a'+' icon which allows you to add a new device user profile.
-
Click the + icon to create a user profile on the server
-
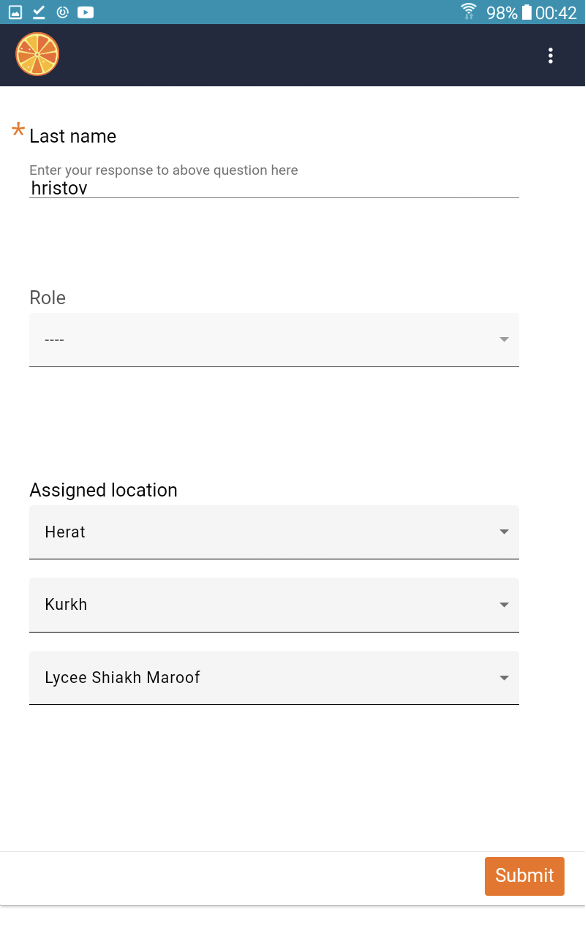
Fill in all information required in the profile and click Submit
-
You will see that next to the Submit button a blue check marks appears indicating that the profile was saved
- Repeat the above steps for all users
Device setup
Now we have to create the 'virtual' devices that will be associated with a real device or browser upon installation. The devices that you create represent a real user device. Each virtual device can be associated with a real tablet only once. After being claimed the device cannot be reused (unless reset and the app re-installed). Each device requires that we assign it to a particular location. This assigned location is automatically attached to each form collected from the tablet. We can also control the synchronization level. This level will indicate to Tangerine what records should be kept in sync across tablets. If you select to synchronize on a top level, all tablets will contain all records collected over all of the facilities in under this top level. It may be better to choose to synchronize only at the bottom level.
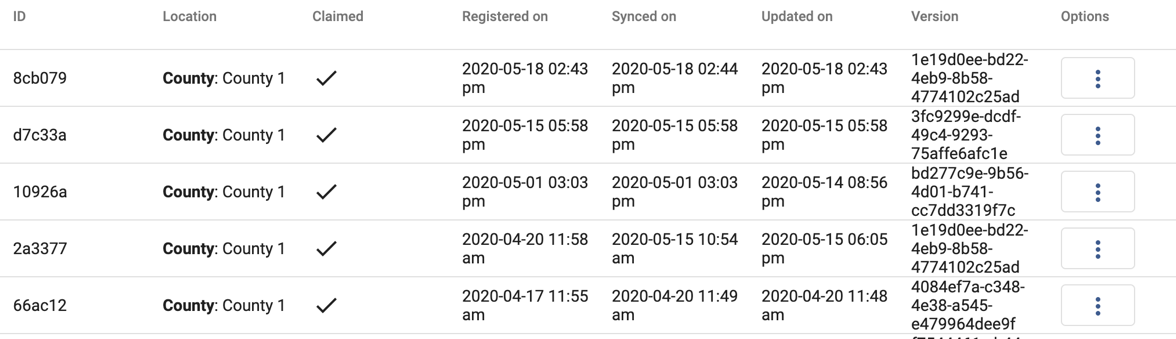
The device listing go to Deploy->Devices
- Here, if you have some devices already created you will see a full listing with some other information
-
The device listing gives you:
-
The ID of the device
-
The assigned location
-
Whether this device has already been used in an installation or not. A checkmark under Claimed indicates that it has been used.
-
Registered on gives you the date this device was first registered
-
The last synchronization date for this device
-
Updated on is the date this device was last updated
-
Version is the version of the application this device is running
-
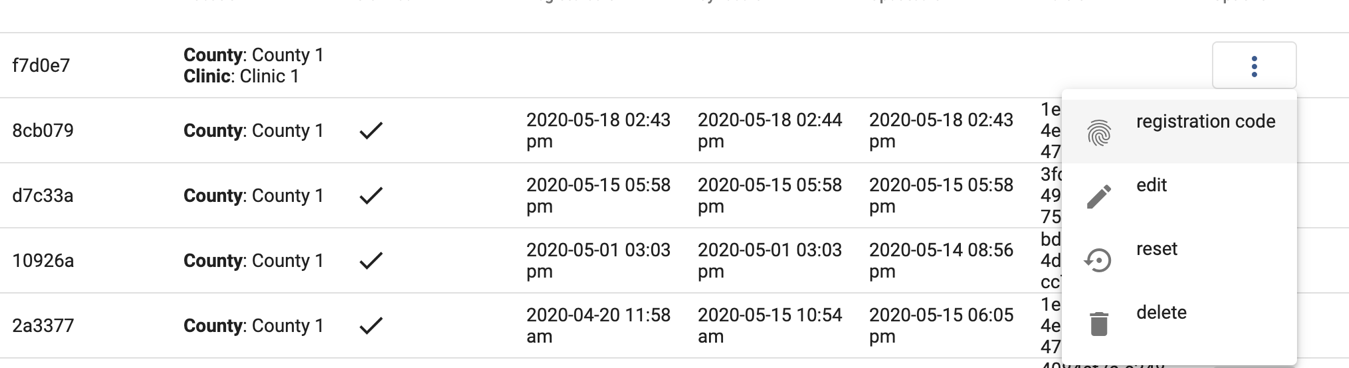
Under options you will have access to a menu allowing you to Edit, Reset, Delete, get The QR registration code for a device.
-
Create a new device by going to Deploy->Devices
-
Click the + icon at the bottom of the page
-
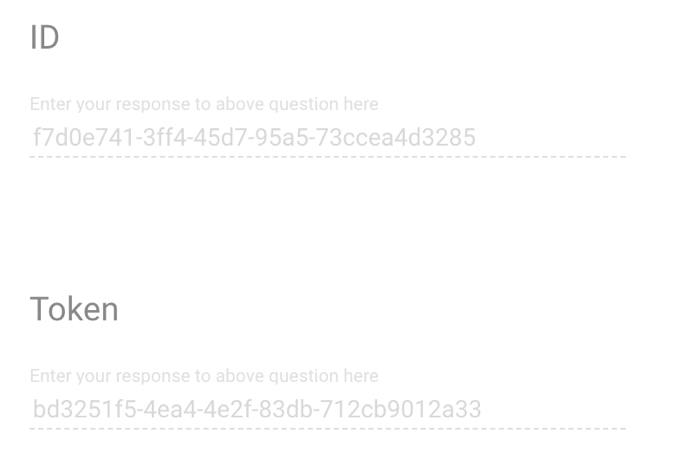
Note that you have the ID and Token listed here (can also be access by clicking Edit for a particular device on the device listing screen) In cases where the QR code cannot be sent to the site for installation you can also use the ID and Token to install Tangerine.
-
Select the location this device is assigned to
-
Select the synchronization level
-
Select the actual site to be used for synchronization. Be careful here not to assign the device to one location and select a different one for synchronization.
-
Click Submit
-
The device now shows up on the of the list and you can get the QR code for it by clicking the Options menu and selecting Registration Code
- Repeat the above steps for all devices that you need to use on your project.
NOTE: you may wish to store the device ID and Token in a file for safe keeping. Such a sample file can be found here. Put the device ID and the Token in the corresponding columns and the QR code will be generated for you. Keep in mind that his worksheet functions correctly only on Google Drive. You can also print this file and distribute the installation codes on paper.
Device modification
It may happen that you want to modify a device that is already in use. Although you will be able to do that in the interface, this modification is not pushed to the actual tablet. The way to go here is to apply the modification reset the device, and send the new Registration Code or ID and Token to the admin to reinstall the application. Make sure that before re-installing the app all data is synchronized.
NOTE: You can edit all devices that have not been claimed yet.
To Edit a device, click the Edit button in the Options menu. Apply any modifications and click Submit
To Delete a device , click the Delete button in the Options menu. Keep in mind that any device that you delete will disallow this device from synchronization or updates. Use this option if you have had one of your devices stolen or lost.
To Reset a device, click the Reset button in the options menu. This action will disallow the device from receiving updates or synchronizing data. Use this option, if one of your staff members leaves and will no longer use this device. Make sure data is synchronized before you reset the device.